Category: Handle Interruptions

Implement Data Masking – Keeping Data Safe and Secure

  1. Log in to the Azure portal at https://portal.azure.com ➢ navigate to the Azure Synapse Analytics workspace you created in Exercise 3.3 ➢ select the SQL Pools navigation menu link ➢ select your dedicated SQL pool ➢ start the SQL pool ➢ after the SQL pool is running, select the Dynamic Data Masking blade ➢ select the + Add Mask menu item ➢ make the configurations as shown in Figure 8.39 ➢ and then click the Add button.
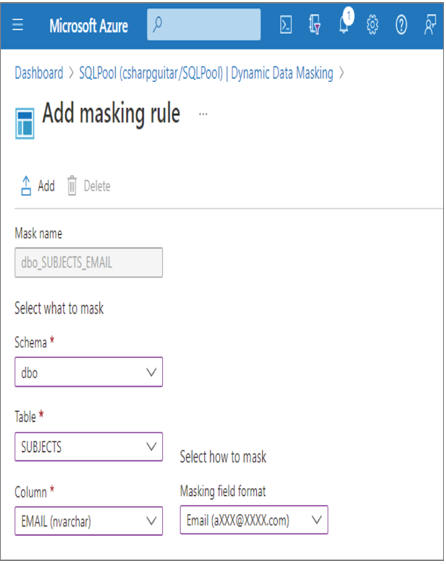
FIGURE 8.39 Implement data masking and masking rule.

  1. Click the Save button ➢ log in to the dedicated SQL pool using Azure Data Studio, with the credentials created in Exercise 8.7 ➢ and then execute the following:
    SELECT ID, FIRSTNAME, LASTNAME, EMAIL, COUNTRY, CREATE_DATE FROM dbo.SUBJECTS
  2. Notice that the data in the EMAIL column has the mask configured in step 1 and illustrated in Figure 8.39. Stop the dedicated SQL pool.

It is possible to configure a custom mask instead of using the preconfigured masks. This requires that you provide the number of starting characters to show, followed by the padding string (something like xxxxx.), followed by the number of ending characters to display. Using a prefix and suffix value of three and the padding on the EMAIL column would result in benxxxxx.net, for example, which is a bit more useful than what is provided using the default.

Manage Identities, Keys, and Secrets Across Different Data Platform Technologies

Protecting credentials has historically been very challenging. Developers and data engineers need to access data, and that data is protected by an ID and password. As the complexity and size of your organization grows, it is easy to lose control over who has what credentials. Add that loss of control to the potential impact changing a password can have on a production environment. This scenario is commonly referred to as credential leakage. An initial solution to credential leakage was to store connection details in a managed credential store, something like Azure Key Vault. However, access to the credential store also requires credentials, so you are back in the same place as before the implementation of the credential store. The ultimate solution is to use a combination of Azure Key Vault and managed identities. Instead of using a credential to make a connection to a storage account or a database from application code, you instead reference the Azure Key Vault endpoint. An Azure Key Vault secret endpoint resembles the following:

https://<accountName>.vault.azure.net/secrets/<secretName>/5db1a9b5…

The code that uses that endpoint must implement the DefaultAzureCredential class from the Azure Identity library. The library works with all popular programming languages: .NET, Python, Go, Java, etc. Passing a new DefaultAzureCredential class to the SecretClient class results in the acquisition of the managed identity credential, which is a token. The client then stores all necessary attributes to perform the retrieval of a secret from the Azure Key Vault endpoint. The following C# code performs this activity:

 var kvUri = “https://” + accountName + “.vault.azure.net”;
 var client = new SecretClient(new Uri(kvUri), new DefaultAzureCredential());

You can use the client to get a secret by using the following C# syntax:

 var secret = await client.GetSecretAsync(secretName);

Now you know how a managed identity can avoid credential leakage, but you might be wondering what exactly are managed identities and what important aspects must you know in order to implement them safely and securely? Table 8.3 compares the two types of managed identities: system‐assigned and user‐assigned.

TABLE 8.3 Managed identity types

CharacteristicSystem‐assigned managed identityUser‐assigned managed identity
ProvisioningAzure resources receive an identity by default, where supported.Created manually
RemovalThe identity is deleted when the associated Azure resource is deleted.Deleted manually
SharingThe identity cannot be shared among Azure resources.Can be shared

A system‐assigned managed identity is created during the provisioning of the Azure resource. For example, an Azure Synapse Analytics workspace and a Microsoft Purview account both have a system‐assigned identity by default. Azure products that are generally used to make connections to other Azure products or features have this managed identity created by default. In contrast, an Azure storage account receives data but does not commonly push data out to other systems, that would need an identity to do so. This is why you see no managed identities for Azure storage accounts. A system‐assigned managed identity can be used only by the Azure resource to which it is bound, and it is deleted when the Azure resource is deleted. A user‐assigned managed identity can be shared across Azure products and is a separate resource in itself and can have its own lifecycle. Perform Exercise 8.9, where you create a user‐assigned managed identity.

Configure and Perform a Data Asset Scan Using Microsoft Purview – Keeping Data Safe and Secure-1

  1. Log in to the Azure portal at https://portal.azure.com ➢ navigate to the Azure Synapse Analytics workspace you created in Exercise 3.3 ➢ select the Access Control (IAM) navigation menu item ➢ click the + Add menu button ➢ select Add Role Assignment from the drop‐down list ➢ select Reader from the Role list ➢ click Next ➢ select the Managed Identity radio button ➢ click the + Select member link ➢ select Microsoft Purview Account from the Managed Identity drop‐down list box ➢ select the Microsoft Purview account you created in Exercise 8.2 ➢ click the Select button ➢ click the Review + Assign button ➢ navigate to the Overview blade ➢ click the Open link in the Open Synapse Studio tile ➢ select the Manage hub ➢ select SQL Pools from the menu list ➢ and then start the dedicated SQL pool.
  2. Select the Manage hub ➢ select the Microsoft Purview item in the External Connections section ➢ click the Connect to a Purview Account button ➢ select the Purview account created in Exercise 8.2 (for example, brainjammer) ➢ click Apply ➢ and then select the link to your Microsoft Purview account tab, as shown in Figure 8.20.

FIGURE 8.20 Connecting Microsoft Purview to Azure Synapse Analytics workspace

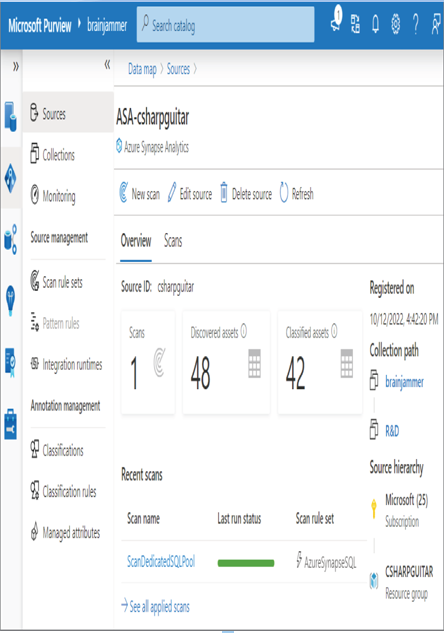
  1. Select the Data Map hub ➢ select Sources from the navigation menu ➢ select the Register menu item ➢ select Azure Synapse Analytics from the Register Source window ➢ click Continue ➢ enter a name (I used ASA‐csharpguitar) ➢ select the workspace you configured in step 2 from the Workspace Name drop‐down list box ➢ select the R&D collection from the Select a Collection drop‐down list box ➢ and then click Register.
  2. Select the View Details link on the just registered source in the Map view ➢ select the New Scan menu item ➢ enter a name (I used ScanDedicatedSQLPool) ➢ select + New from the Credential drop‐down list box ➢ enter a name (I used sqladminuser) ➢ enter the user ID/name of your Azure Synapse Analytics dedicated SQL pool (I used sqladminuser) ➢ select the + New from the Key Vault Connection drop‐down list box ➢ enter a name (I used brainjammerKV) ➢ select the Key Vault you created in Exercise 8.1 ➢ click Create ➢ enter the Azure Key Vault secret name that stores your Azure Synapse Analytics password (I used azureSynapseSQLPool) ➢ click Create ➢ select your dedicated SQL pool from the SQL Database drop‐down list box ➢ select the Test Connection link ➢ and then click Continue. The configuration resembles Figure 8.21.

FIGURE 8.21 Configuring scanning in Microsoft Purview

  1. Click the Continue button to perform the scan using the default scan rule set ➢ select the Once radio button ➢ click Continue ➢ and then click the Save and Run button. When the scan is complete, you will see something like Figure 8.22.

FIGURE 8.22 The result of a Microsoft Purview scan

  1. Stop your Azure Synapse Analytics dedicated SQL pool.

Implement a Data Retention Policy – Keeping Data Safe and Secure

  1. Log in to the Azure portal at https://portal.azure.com ➢ navigate to the Azure Synapse Analytics workspace you created in Exercise 3.3 ➢ select the SQL Pools navigation menu link ➢ select your dedicated SQL pool ➢ start the SQL pool ➢ select the Overview blade ➢ and then click the Open link in the Open Synapse Studio tile.
  2. Navigate to the Data hub ➢ select the ellipse (…) to the right of your dedicated SQL pool ➢ select New SQL script from the pop‐up menu ➢ select Empty Script ➢ and then execute the following command. The command text is available in the uspApply90DayRetentionPolicySubjects.sql file in the Chapter08/Ch08Ex06 directory on GitHub.
    CREATE PROCEDURE dbo.uspApply90DayRetentionPolicySubjects

AS DELETE FROM dbo.SUBJECTS WHERE CREATE_DATE>DATEADD(DAY, -90,GETDATE()) GO

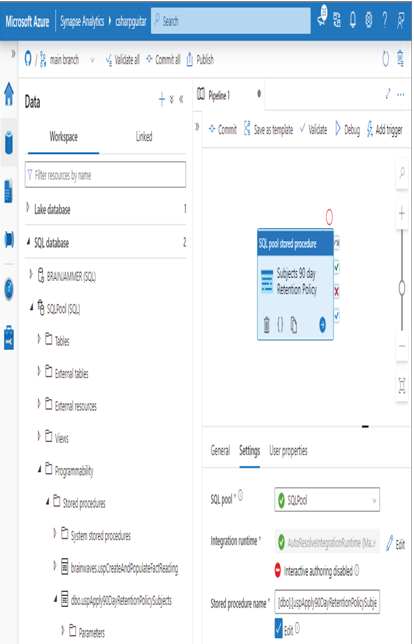
  1. Expand your dedicated SQL pool ➢ expand the Programmability folder ➢ expand the Stored Procedures folder ➢ select the ellipse to the right of the stored procedure you created in step 2 ➢ select Add to Pipeline from the pop‐up menu ➢ select New Pipeline from the pop‐out menu ➢ enter a name (I used Subjects 90 day Retention Policy) ➢ select the Settings tab ➢ click Commit ➢ click Publish ➢ and then click OK. The configuration should resemble Figure 8.32.

FIGURE 8.32 Implement a data retention policy in Azure Synapse Analytics.

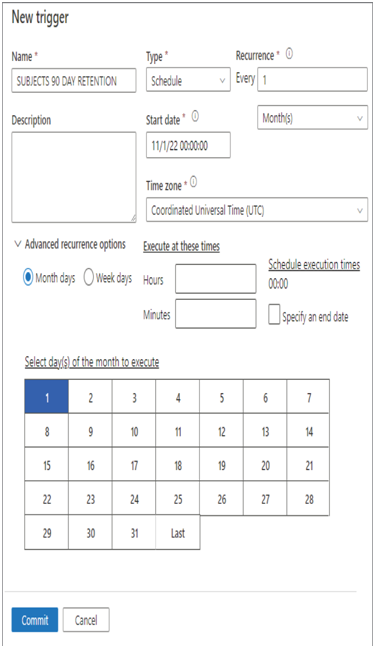
  1. Click the Add Trigger button ➢ select New/Edit ➢ select + New from the Add Triggers drop‐down list box ➢ configure the scheduled task to run on the first day of every month, similar to that shown in Figure 8.33 ➢ click the Commit button ➢ and then publish the trigger.

FIGURE 8.33 Implement a data retention policy schedule pipeline trigger.

  1. Stop the dedicated SQL pool.

Exercise 8.6 begins with the creation of a stored procedure that removes data from the SUBJECTS table. The WHERE clause checks if the date contained in the CREATE_DATE column is older than 90 days. If it is, then the row is deleted. You then added that stored procedure to an Azure Synapse Analytics pipeline using the SQL pool Stored Procedure activity. Once committed and published, you configured a schedule trigger to run the stored procedure once per month. This results in the deletion of data based on a 90‐day retention. You might consider not committing and publishing the trigger, unless you really want to implement the retention policy.

Design and Create Tests for Data Pipelines – Design and Implement a Data Stream Processing Solution

The data pipeline used in most examples in this chapter has included a data producer, an Event Hubs endpoint, and an Azure Stream Analytics job. Those components create the data, ingest the data, and then process the data stream. The processed data then flows into datastores like ADLS, an Azure Synapse Analytics SQL pool, Azure Cosmos DB, and Power BI. All those different parts make up the data pipeline.

To design a test for the data pipeline, you must identity the different components, which were mentioned in the preceding paragraph. The next step is to analyze each component to determine exactly what the data input format is, what is used to process that data, and what the output should be. If you take the BCI that produces brain wave readings, for example, the input consists of analog vibrations originating from a brain. The BCI is connected to a computer via Bluetooth, and a program converts the analog reading to a numeric value, which is then formatted into a JSON document and streamed to an event hub. Therefore, changes to the code that captures, transforms, and streams the brain wave readings to the event bub must be tested through the entire pipeline. Data is not modified as it flows through the event hub, so the next step in the pipeline to analyze is the Azure Stream Analytics job query. If the format of the incoming data stream had been changed, a change to the query would be required. For example, the addition of a new column to the data event message would require a change to the query. The final step is to validate that the output of the stream processing had an expected result on all downstream datastores that receive the processed data content.

In most mid‐ to large‐size projects, you would perform these tests in a testing environment that has an exact replica of the production data pipeline. As you learned in Chapter 6, you can use an Azure DevOps component named Azure Test Plans for more formal new features and regression testing capabilities. You will learn more about Azure Test Plans in Chapter 9, “Monitoring Azure Data Storage and Processing,” and Chapter 10, “Troubleshoot Data Storage Processing.”

Monitor for Performance and Functional Regressions

The “Configure Checkpoints/Watermarking During Processing” section discussed some metrics that are useful for monitoring performance, such as Watermark Delay, Resource Utilization, and Events Count (refer to Figure 7.44). Many other metrics are available. The following are a few of the more interesting metrics:

  • Backlogged Input Events
  • CPU % Utilization
  • Data Conversion Errors
  • Early Input Events
  • Input Events
  • Last Input Events
  • Out of order Events
  • Output Events
  • Runtime errors
  • SU (Memory) % Utilization

Each of these metrics can potentially help you find out the cause of issues your Azure Stream Analytics job is having. A regression means that a bug in your code that was previously fixed has been reintroduced into the application. From an Azure Stream Analytics perspective, this would happen in the query, or, if your job contains a function, the code may have been corrupted in that area of the processing logic. To help determine when this happened, you can review the Activity Log blade, which provides a list of changes made over a given time frame. If you have your queries and function code in a source code repository, then you could also take a look in the file history to see who changed and merged the code, when, and how.

Design to Purge Data Based on Business Requirements – Keeping Data Safe and Secure

The primary difference between purging and deleting has to do with whether or not the data is gone for good. When you purge data, it means there is no way to recover it. If something called a soft delete is enabled, it means that the data can be recovered during a preconfigured timeframe. After that timeframe, the data will be purged. Soft‐deleted data continues to consume storage space in your database or on your datastore, like an Azure storage container. The storage consumption is only freed when the data is purged. Like all scenarios related to retention and data deletion discussed up to now, you need to first decide which data has a sensitivity level that must adhere to a retention policy. Once you determine which data must be deleted, you need to determine at what age the data should be removed. After identifying those two pieces of information, you might consider deleting the data from your database using the DELETE SQL command. The following command removes all the data from the SUBJECTS table where the CREATE_DATE value is 3 months old from the current date:

 DELETE FROM SUBJECTS WHERE CREATE_DATE < DATEADD(month, -3, GETDATE())

When the amount of data is large, this kind of query can have a significant impact on performance. The impact can result in latency experienced by other data clients inserting, updating, or reading data from the same database. A very fast procedure for removing data is to place the data onto a partition that is defined by the column that defines the lifecycle of the data, for example, using the CREATE_DATE in the SUBJECTS table as the basis for a partition. When the data on that partition has breached the retention threshold, remove the partition, and the data is removed. Another approach is to select the data you want to keep, use the result to insert it into another table, and then switch the tables. This is achieved using CTAS, which was introduced in Chapter 2, “CREATE DATABASE dbName; GO,” along with the partitioning concept mentioned previously. The following SQL snippet is an example of how to achieve the purging of data without using the DELETE SQL command:

 SELECT * INTO SUBJECTS_NEW FROM SUBJECTS 
 WHERE CREATE_DATE> DATEADD(month, -3, GETDATE())
 RENAME OBJECT SUBJECTS TO SUBJECTS_OLD
 RENAME OBJECT SUBJECTS_NEW TO SUBJECTS
 DROP TABLE SUBJECTS_OLD

The SELECT statement retrieves the data with a creation date that is not older than 3 months and places the data into a new table. The existing primary table named SUBJECTS is renamed by appending _OLD to the end. Then the newly populated table that was appended with _NEW is renamed to the primary table name of SUBJECTS. Lastly, the table containing data that is older than 3 months is dropped, resulting in its deletion.

Replay an Archived Stream Data in Azure Stream Analytics – Design and Implement a Data Stream Processing Solution

  1. Log in to the Azure portal at https://portal.azure.com➢ navigate to the Azure Stream Analytics job you created in Exercise 3.17➢ select Input from the navigation menu ➢ select the + Add Stream Input drop‐down menu ➢ select Blob Sorage/ADLS Gen2 ➢ provide an input alias name (I used archive) ➢ select Connection String from the Authentication Mode drop‐down list box ➢ select the ADLS container where you stored the output in Exercise 7.9➢ and then enter the path to the file into the Path Pattern text box, perhaps like the following. Note that the filename is shortened for brevity and is not the actual filename of the output from Exercise 7.9.
    EMEA/brainjammer/in/2022/09/09/10/0_bf325906d_1.json
  2. The configuration should resemble Figure 7.46. Click the Save button.

FIGURE 7.46 Configurating an archive input alias

  1. Select Query from the navigation menu ➢ enter the following query into the query window ➢ click the Save Query button ➢ and then start the job. The query is available in the StreamAnalyticsQuery.txt file located in the Chapter07/Ch07Ex10 directory on GitHub.
    SELECT Scenario, ReadingDate, ALPHA, BETA_H, BETA_L, GAMMA, THETA

INTO ADLS

FROM archive

  1. Wait until the job has started ➢ navigate to the ADLS container and location you configured for the archive input alias in step 1 ➢ download the 0_bf325906d_1.json file from the Chapter07/Ch07Ex10 directory on GitHub ➢ upload that file to the ADLS container ➢ and then navigate to the location configured for your ADLS Output alias. A duplicate of the file is present, as shown in Figure 7.47.

FIGURE 7.47 Archive replay data result

  1. Stop the Azure Stream Analytics job.

Exercise 7.10 illustrates how a file generated by the output of a data stream can be replayed and stored on a targeted datastore. You may be wondering why something like this would be needed. Testing new features, populating testing environments with data, or taking a backup of the data are a few reasons for archiving and replaying data streams. One additional reason to replay data is due to downstream systems not receiving the output. The reason for missing data might be an outage on the downstream system or a timing issue. If an outage happened downstream and data was missing from that store, it is likely easy to understand why: the data is missing because the datastore was not available to receive the data.

The timing issue that can result in missing data can be caused by the timestamp assigned to the data file. The timestamp for a data file stored in an ADLS container is in an attribute named BlobLastModifiedUtcTime. Consider the action you took in step 4 of Exercise 7.10, where you uploaded a new file into the location you configured as the input for your Azure Stream Analytics job. Nothing happened when you initially started the job, for example, at 12:33 PM. This is because files that already exist in that location will not be processed, because their timestamp is earlier than the start time of the Azure Stream Analytics job. When you start a job with a Job Output Start Time of Now (refer to Figure 7.18), only files that arrive after the time are processed. Once you added the file with a timestamp after the job had already been started, for example, 12:40 PM, it got processed.

The same issue could exist for downstream systems, in that the data file could arrive at a datastore but the processor is experiencing an outage of some kind. When it starts back up and is online, it may be configured to start processing files only from the current time forward, which would mean the files received during the downtime will not be processed. In some cases, it might be better and safer to replay the data stream instead of reconfiguring and restarting all the downstream systems to process data received while having availability problems. Adding the file in step 4 is not the only approach for getting the timestamp updated to the current time. If you open the file, make a small change that will not have any impact on downstream processing, and then save it, the timestamp is updated, and it will be processed. Perform Exercise 7.10 again but instead of uploading the 0_bf325906d_1.json file, make a small change to the file already in that directory and notice that it is processed and passed into the output alias ADLS container.

Azure Role‐Based Access Control – Keeping Data Safe and Secure

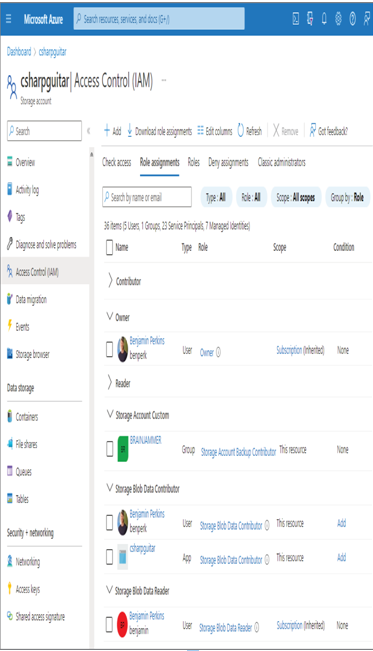
RBAC has been discussed in Chapter 1, “Gaining the Azure Data Engineer Associate Certification,” Chapter 3, “Data Sources and Ingestion,” and Chapter 5. What RBAC is, its purpose, and how it achieves controlling access to Azure resources should be somewhat clear at this point. This section will go into a bit more detail in the context of an Azure storage account that includes an ADLS container. The implementation of RBAC assignments for a specific resource is performed on the Access Control (IAM) blade for the given resource, as you have seen previously in Figure 1.28 and Figure 5.47. Figure 8.17 provides an example of the permission related to an Azure storage account.

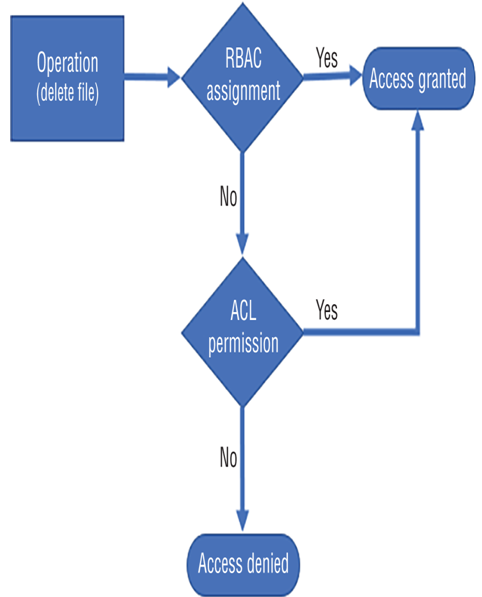
FIGURE 8.16 RBAC and ACL permission evaluation

FIGURE 8.17 RBAC Access Control (IAM) Azure storage account

Notice that the Role Assignments tab is selected and that there are numerous roles and users within them. The roles highlighted are Owner, Storage Blob Data Contributor, and Storage Blob Data Reader. An account that is part of the Owner role has full access to manage all resources within the subscription. In addition to that, members with an Owner role can assign roles to other members. Notice that the Owner group does not grant access to the data layer. The user in the Owner group will not be able to read the data in the storage account with just the Owner permission, although it can look this way in the portal if the Account Key Authentication option is enabled, since the owner does have access to those keys. The permissions section of the JSON role resembles the following, which supports the preceding statement of having full access to all resources:

 “permissions”: [{ “actions”: [ “*” …]

The Storage Blob Data Contributor role concentrates specifically on the storage accounts in the subscription. The following permissions are granted for this role. Notice that members of this role can delete, read, and write blobs to all the containers within the storage account. You might notice the account of type app named csharpguitar. That is the identity linked to the Azure Synapse Analytics workspace and is the way in which it has been granted permission to the ADLS container used for the workspace.

 “permissions”: [{ “actions”: [
  “Microsoft.Storage/storageAccounts/blobServices/containers/delete”,
  “Microsoft.Storage/storageAccounts/blobServices/containers/read”,
  “Microsoft.Storage/storageAccounts/blobServices/containers/write”,
  “Microsoft.Storage/storageAccounts/blobServices/generateUserDelegationKey/action” …]

The ability to receive a SAS key for accessing data within the container is also granted to the Storage Blob Data Contributor role. This is achieved via the generateUserDelegationKey permission. The permissions for Storage Blob Data Reader role are as follows.

 “permissions”: [{ “actions”: [
  “Microsoft.Storage/storageAccounts/blobServices/containers/read”,
  “Microsoft.Storage/storageAccounts/blobServices/generateUserDelegationKey/action” …]

Looking at the permission details, it is easy to see the difference between the Storage Blob Data Contributor role and Storage Blob Data Reader role. There are no permissions for delete or write operations on any container in the storage account for the reader. As illustrated in more granular detail by Figure 8.18, when the member attempts to delete a blob, the platform checks the RBAC role. If the role has permission to delete the blob, then the operation is allowed. If the role does not have the delete permission but the member does have the ACL permission, then the operation will be performed. Without an ACL delete permission, the operation is denied due to access restriction.

FIGURE 8.18 RBAC role and ACL permission evaluation

Remember that if a built‐in RBAC role does not meet your requirements, you can create a custom RBAC role to include or exclude permissions. As shown in Figure 8.17, a group named BRAINJAMMER has been added to a custom RBAC role named Storage Account Custom. The group is an Azure Active Directory security group that contains members who are also part of the Azure Active Directory tenant. Those members receive the permissions associated with the RBAC custom permission list. As you know, adding individual members to RBAC roles at the resource level is the most inefficient approach. Instead, you should create groups that effectively describe the role, add members to it, and then add the group to the RBAC role. You will create this group in Exercise 8.12.

Azure Policy – Keeping Data Safe and Secure

One of the first experiences with a policy in this book came in Exercise 4.5, where you implemented data archiving. You used a lifecycle management policy and applied it directly to an Azure storage account. The policy, which you can view in the Chapter04/Ch04Ex04 directory on GitHub, identifies when blobs should be moved to Cold or Archived tier and when the data should be purged. Azure Policy, on the other hand, enables an Azure administrator to define and assign policies at the Subscription and/or Management Group level. Figure 8.9 illustrates how the Azure Policy Overview blade may look.

FIGURE 8.9 The Azure Policy Overview blade

Each policy shown in Figure 8.9 links to the policy definition constructed using a JSON document, as follows. You can also assign the policy to the Subscription and a Resource group.

The policy rule applies to all resources with an ARM resource ID of Microsoft.Storage and applies to the minimumTlsVersion attribute. When this policy is applied to the Subscription, TLS 1.2 will be the default value when provisioned, but the policy will also allow TLS 1.1; however, TLS 1.0 is not allowed. The provisioning of an Azure storage account that uses TLS 1.0 would fail because of this policy.

Design a Data Retention Policy

Data discovery and classification are required for determining the amount of time you need to retain your data. Some regulations require maximum and/or minimum data retention timelines, depending on the kind of data, which means you need to know what your data is before designing the retention policy. The policy needs to include not only your live, production‐ready data but also backups, snapshots, and archived data. You can achieve this discovery and classification using what was covered in the previous few sections of this chapter. You might recall the mention of Exercise 4.5, where you created a lifecycle management policy that included data archiving logic. The concept and approach are the same here. The scenario in Exercise 4.5 covered the movement and deletion of a blob based on the number of days it was last accessed. However, in this scenario the context is the removal of data based on a retention period. Consider the following policy example, which applies to the blobs and snapshots stored in Azure storage account containers. The policy states that the data is to be deleted after 90 days from the date of creation. This represents a retention period of 90 days.

When it comes to defining retention periods in relational databases like Azure SQL and Azure Synapse Analytics SQL pools, there are numerous creative approaches. One approach might be to add a column to each data row that contains a timestamp that identifies its creation date. You then can run a stored procedure executed from a cron scheduler or triggered using a Pipeline activity. As this additional information can be substantial when your datasets are large, you need to apply it only to datasets that are required to adhere to such policies. It is common to perform backups of relation databases, so remember that the backups, snapshots, and restore points need to be managed and bound to retention periods, as required. In the context of Azure Databricks, you are most commonly working with files or delta tables. Files contain metadata that identifies the creation and last modified date, which can be referenced and used for managing their retention. Delta tables can also include a column for the data’s creation date; this column is used for the management of data retention. When working with delta tables, you can use a vacuum to remove backed up data files. Any data retention policy you require in that workspace should include the execution of the vacuum command.

A final subject that should be covered in the context of data retention is something called time‐based retention policies for immutable blob data. “Immutable” means that once a blob is created, it can be read but not modified or deleted. This is often referred to as a write once, read many (WORM) tactic. The use case for such a feature is to store critical data and protect it against removal or modification. Numerous regulatory and compliance laws require documents to be stored for a given amount of time in their original state.

Exam Essentials – Design and Implement a Data Stream Processing Solution

Azure Event Hubs, Azure Stream Analytics, and Power BI. When you are designing your stream processing solution, one consideration is interoperability. Azure Event Hubs, Azure Stream Analytics, and Power BI are compatible with each other and can be used seamlessly to implement your data stream processing design. Other products are available on the Azure platform for streaming, such as HDInsight 3.6, Hadoop, Azure Databricks, Apache Storm, and WebJobs.

Windowed aggregates. Windowing is provided through temporal features like tumbling, hopping, sliding, session, and snapshot windows. Aggregate functions are methods that can calculate averages, maximums, minimums, and medians. Windowed aggregates enable you to aggregate temporal windows.

Partitions. Partitioning is the grouping of similar data together in close physical proximity in order to gain more efficient storage and query execution speed. Both efficiency and speed of execution are attained when data with matching partition keys is stored and retrieved from a single node. Data queries that pull data from remote datastores, different partition keys, or data that is located on more than a single node take longer to complete.

Time management. The tracking of the time when data is streaming into an ingestion point is crucial when it comes to recovering from a disruption. The timestamps linked to an event message, such as event time, arrival time, and the watermark, all help in this recovery. The event time identifies when the data message was created on the data‐producing IoT device. The arrival time is the enqueued time and reflects when the event message arrived at the ingestion endpoint, like Event Hubs.

Watermark. As shown in Figure 7.41, the watermark is a time that reflects the temporal time frame in which the data was processed by the stream processor. If the time window is 5 seconds, all event messages processed within that time window will receive the same watermark.

Create an Azure Key Vault Resource – Keeping Data Safe and Secure-2

The Networking tab enables you to configure a private endpoint or the binding to a virtual network (VNet). The provisioning and binding of Azure resources to a VNet and private endpoints are discussed and performed in a later section. After the provisioning the key vault, you created a key, secret, and a certificate. The keys in an Azure key vault refer to those used in asymmetric/public key cryptography. As shown in Figure 8.2, two types of keys are available with Standard tier: Rivest‐Shamir‐Adleman (RSA) and elliptic curve (EC). These keys are used to encrypt and decrypt data (i.e., public‐key cryptography). Both keys are asymmetric, which means they both have a private and public key. The private key must be protected, as any client can use the public key to encrypt, but only the private key can decrypt it. Each of these keys has multiple options for the strength of encryption. For example, RSA has 2,048, 3,072, and 4,096 bits. The higher the number, the higher the level of security. High RSA numbers have caveats concerning speed and compatibility. The higher level of encryption requires more time to decrypt, and not all platforms can comply with such high levels of encryption. Therefore, you need to consider which level of security is best for your use case and security compliance requirements.

A secret is something like a password, connection string, or any text up to 25k bytes that needs protection. Connection strings and passwords commonly are stored in configuration files or hard coded into application code. This is not secure, because anyone who has access to the code or the server hosting the configuration file has access to the credentials and therefore the resources protected by them. Instead of that approach, applications can be coded to retrieve the secret from a key vault, then use it for making the required connections. In a production environment, the secret can be authenticated against a managed identity or service principal when requested.

Secrets stored in a key vault are encrypted when added and decrypted when retrieved. The certificate support in Azure Key Vault provides the management of x509 certificates. If you have ever worked on an Internet application that uses the HTTP protocol, you have likely used an x509 certificate. When this type of certificate is applied to that protocol, it secures communication between the entities engaged in the conversation. To employ the certificate, you must use HTTPS, and this is commonly referred to as Transport Layer Security (TLS). In addition to securing communication over the Internet, certificates can also be used for authentication and for signing software. Consider the certificate you created in Exercise 8.1. When you click the certificate, you will notice it has a Certificate Version that resembles a GUID but without the dashes. Associated to that Certificate Version is a Certificate Identifier, which is a URL that gives you access to the certificate details. When you enter the following command using the Azure CLI, you will see information like the base‐64–encoded certificate, the link to the private key, and the link to the public key, similar to that shown in Figure 8.6.

FIGURE 8.6 Azure Key Vault x509 certificate details

The link to the private key and public keys can be used to retrieve the details in a similar fashion. The first Azure CLI cmdlet retrieves the private key of the x509 certificate, which is identified by the kid attribute. The second retrieves the public key using the endpoint identified by the sid attribute.

The ability to list, get, and use keys, secrets, and certificates is controlled by the permissions you set up while creating the key vault. Put some thought into who and what gets which kind of permissions to these resources.