Implement Column‐level Security – Keeping Data Safe and Secure

- Log in to the Azure portal at https://portal.azure.com ➢ navigate to the Azure Synapse Analytics workspace you created in Exercise 3.3 ➢ select the SQL Pools navigation menu link ➢ select your dedicated SQL pool ➢ start the SQL pool ➢ after the SQL pool is running, select the Overview blade ➢ and then click the Open link in the Open Synapse Studio tile.
- Navigate to the Data hub ➢ select the ellipse (…) to the right of your dedicated SQL pool ➢ select New SQL Script from the pop‐up menu ➢ select Empty Script ➢ select master from the Use Database drop‐down list box ➢ and then execute the following:
CREATE LOGIN brainjammer WITH PASSWORD = ‘csh@rpgu1tar’ - Select your dedicated SQL pool from the Use Database drop‐down list box, and then execute the following. The SQL is located in the column‐level.sql file in the Chapter08/Ch08Ex07 directory on GitHub.
CREATE USER brainjammer FROM LOGIN brainjammer WITH DEFAULT_SCHEMA = dbo
EXEC sp_addrolemember ‘db_datareader’, ‘brainjammer’
DENY SELECT ON dbo.SUBJECTS TO brainjammer
GRANT SELECT ON SUBJECTS
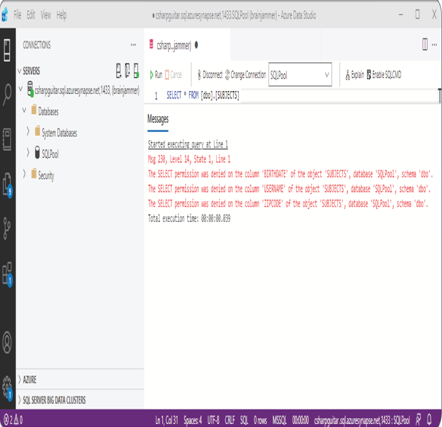
(ID, FIRSTNAME, LASTNAME, EMAIL, COUNTRY, CREATE_DATE) TO brainjammer - Log in to the dedicated SQL pool using Azure Data Studio; for example, executing the following with the user created in step 2 will give you the error shown in Figure 8.37.
SELECT * FROM [dbo].[SUBJECTS]

FIGURE 8.37 Column‐level security enforcement exception
- Stop the dedicated SQL pool.
Before you can create a user for a specific database, the login must first exist on the master database. Executing the following SQL command while targeting the master database hosted on your dedicated SQL pool accomplishes this:
CREATE LOGIN brainjammer WITH PASSWORD = ‘csh@rpgu1tar’
Redirecting focus back to the SQLPool database, you then create a user who uses the login credentials created on the master database. You accomplished this with the following SQL statement. In addition to the user account creation, the default schema is set to dbo, which is where the SUBJECTS table is located.
CREATE USER brainjammer FROM LOGIN brainjammer WITH DEFAULT_SCHEMA = dbo
Adding the user account to a read‐only group, as follows, provides read access permissions to all the tables on that database:
EXEC sp_addrolemember ‘db_datareader’, ‘brainjammer’
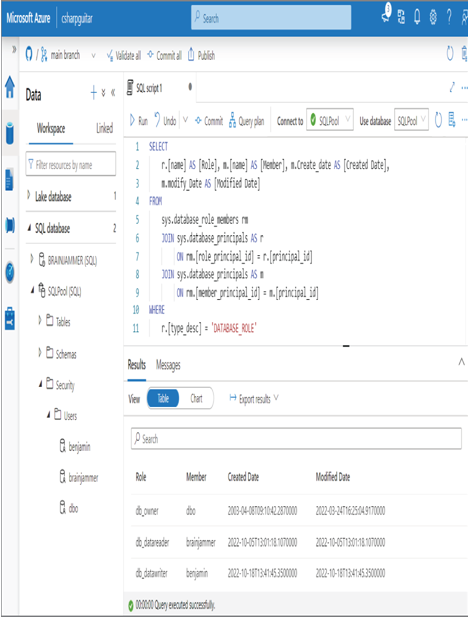
To view all roles and the members of those roles, execute the following SQL command. This SQL text is located in the databaseRole.sql file in the Chapter08/Ch08Ex07 directory on GitHub. Figure 8.38 shows the result of the query.

FIGURE 8.38 Role and membership details on a dedicated SQL pool database
When the user is granted read access to the tables, it defaults to all the columns on that table. In order to remove access to all the columns for the SUBJECTS table, you first execute the following SQL statement, which removes SELECT access to the table:
DENY SELECT ON dbo.SUBJECTS TO brainjammer
Then you use the following SQL command to grant access only to the columns that the user should be permitted to retrieve:
GRANT SELECT ON SUBJECTS
(ID, FIRSTNAME, LASTNAME, EMAIL, COUNTRY, CREATE_DATE) TO brainjammer
From that point on, when the user, brainjammer, accesses the SQLPool database and retrieves data from the SUBJECTS table, only the columns that have been granted permission can be retrieved. The following is the SQL query, followed by the output:
SELECT ID, FIRSTNAME, LASTNAME, EMAIL, COUNTRY, CREATE_DATE FROM dbo.SUBJECTS
Always shut down the dedicated SQL pool when not in use, to reduce costs.
Implement Data Masking
The primary difference between column‐level security and dynamic data masking is that column‐level security prevents the retrieval of the column completely. For example, if a user does not have permission on a column named BIRTHDATE and they attempt to retrieve it, a permission denied exception is rendered. Data masking, however, does allow the retrieval of the column data, although the data is partially concealed. Consider, for example, the EMAIL column from Exercise 8.7, which contains an individual’s email address. This is not data you would want everyone to have access to, for numerous reasons. For example, someone writes a program that is intended to notify your customers of downtime or outage events. Consider that there are hundreds of thousands of customers in your database. During testing, the data is selected and emails sent to all your customers. Placing a mask on the EMAIL column would change the retrieved value from [email protected] to [email protected]. Doing so would prevent sending all your customers an email on error. At the same time, however, you might want to see part of the column value for validation, perhaps the last four digits of a credit card number or identification number. Complete Exercise 8.8, where you will configure a dynamic data mask on the EMAIL column of the SUBJECTS table.

Leave a Reply