Create a Microsoft Purview Account – Keeping Data Safe and Secure

- Log in to the Azure portal at https://portal.azure.com ➢ enter Purview in the search box in the upper middle of the browser ➢ select Microsoft Purview account ➢ select the + Create menu option ➢ select the subscription ➢ select the resource group ➢ enter a Microsoft Purview account name (I used brainjammer) ➢ select a region ➢ leave the managed resources as the default ➢ navigate through the other tabs ➢ leave the defaults ➢ click the Review + Create button ➢ and then click Create.
- Once provisioning is complete, navigate to the Microsoft Purview Overview blade ➢ select the Open link to open the Microsoft Purview Governance Portal ➢ select the Data Map hub ➢ select Collections ➢ and then select the Role Assignments tab, as shown in Figure 8.7. Make sure your account is within the Collection Admins group; if not, add it.
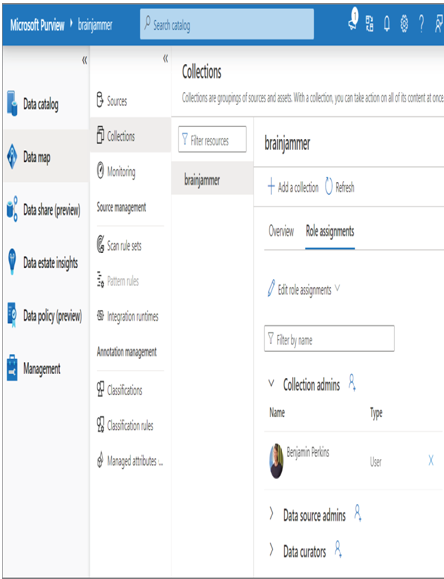
FIGURE 8.7 Microsoft Purview default root collection
- Click the + Add a Collection menu button ➢ enter Data Engineering in the Display Name text box ➢ enter your account into the Collection Admins group ➢ click the Create button ➢ and then select the root collection (for example, brainjammer) to do the same again, but this time enter R&D in the Display Name text box.
- Select the Sources navigation link ➢ click the Register menu button ➢ select the Azure Data Lake Storage Gen2 resource ➢ click Continue ➢ enter a name (I used ADLS‐csharpguitar) ➢ select the subscription that contains the ADLS container you created in Exercise 3.1 ➢ select the storage account name ➢ select Data Engineering from the Select a Collection drop‐down list ➢ click the Register button ➢ click the Register button again ➢ select Azure Synapse Analytics ➢ click Continue ➢ enter a name (I used ASA‐csharpguitar) ➢ select the subscription that contains the Azure Synapse Analytics workspace you created in Exercise 3.3 ➢ select R&D from the Select a Collection drop‐down list ➢ and then click Register. The result should resemble Figure 8.8.
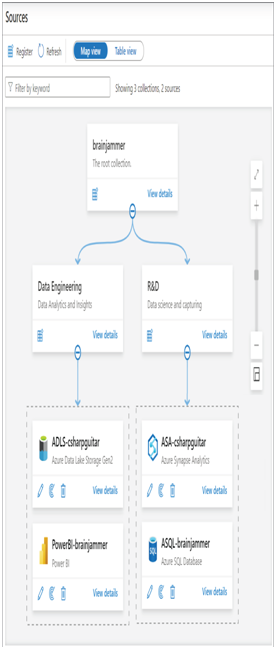
FIGURE 8.8 Microsoft Purview Map view
- Navigate to the Azure Key Vault you created in Exercise 8.1 ➢ select Access Policies ➢ click the + Create menu button ➢ check the Get and List operations in the Secret permissions / Secret Management Operations section ➢ click Next ➢ search for and select the Microsoft Purview account name you just provisioned ➢ click the Next button twice ➢ and then click Create.
The additional registration of the Power BI workspace and an Azure SQL database are for effect only at this point. Feel free to register additional or different resources to your collections. The provisioning of the account was straightforward. You were again confronted by the concept of a Managed Resource group, which you experienced in Exercise 3.3. As a reminder, this resource group contains Azure products required by the provisioned resource. In this case, an Azure storage account is required and was stored in the provisioned Managed Resource group. In Exercise 8.2 you configured two collections, Data Engineering and R&D. The Data Engineering collection has the Power BI workspace and the ADLS container associated with it, while the R&D collection has the Azure Synapse Analytics workspace and an Azure SQL database. The structure of the collection hierarchy and associated sources provides some context to approach the policies, compliance, and governance constraints placed on them. Sorting together which datastores are necessary per collection provides you the means for setting policies on those resources based on the individuals affiliated with those groups. You did not perform the activity of scanning in Exercise 8.2 because of the requirement of managed identities. This will be discussed in the “Implement a Data Auditing Strategy” section.
Leave a Reply