Author: Terry Decker

Design and Configure Exception Handling – Design and Implement a Data Stream Processing Solution

An exception is an unexpected event that occurs in the execution of your program code or query. Exceptions do happen and need to be managed because, in most cases, unmanaged exceptions stop the execution of your code at that point. This can leave your data and your program in an undesirable state, which can result in further data corruption. You need to understand which kinds of known exceptions can happen in your Azure Stream Analytics processing. Table 7.8 provides a list of Azure Stream Analytics exceptions.

TABLE 7.8 Azure Stream Analytics exceptions

ExceptionDescription
InputDeserializationErrorUnable to deserialize input data.
InputEventTimestampNotFoundUnable to retrieve a timestamp for a resource.
InputEventTimestampByOverValueNotFoundCannot get the value of the TIMESTAMP BY OVER COLUMN.
InputEventLateBeyondThresholdAn event was sent later than the configured tolerance.
InputEventEarlyBeyondThresholdAn event has an arrival time earlier than the application timestamp.
AzureFunctionMessageSizeExceededThe output message exceeds the size limit for Azure Functions.
EventHubOutputRecordExceedsSizeLimitThe record exceeds the message size limit for Event Hubs.
CosmosDBOutputInvalidIdThe type or value of a column is invalid.
CosmosDBOutputInvalidIdCharacterThere is an invalid character in the document ID for the record.
CosmosDBOutputMissingIdThe record does not contain an ID to use as a primary key.
CosmosDBOutputMissingIdColumnThe record is missing a document ID property.
CosmosDBOutputMissingPartitionKeyThe record is missing the partition key property.
CosmosDBOutputSingleRecordTooLargeA single record is too large to write.
SQLDatabaseOutputDataErrorCannot write to Azure SQL Database due to data issues.

When you begin processing your data stream and nothing is happening, the reason is likely one of the exceptions listed in Table 7.8. There are numerous locations where you can view exceptions that get thrown during the stream processing. The first one is diagnostic logging, which is configurable from the Diagnostic Settings blade in the Azure portal. There is more on this feature in Chapter 9; however, look at Figure 7.50 to get an idea about what this looks like.

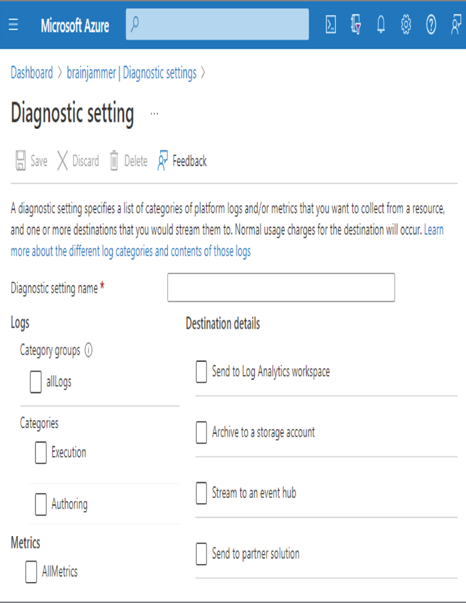
FIGURE 7.50 Azure Stream Analytics Diagnostics Setting

Notice the different categories and that logging performance metrics are also possible. The locations where you can store the logs are listed in the Destination Details column. The options are a Log Analytics workspace, a storage account, an event hub, or a partner solution, which are endpoints provided by Microsoft Azure partners. The other location to view exceptions is on the Activity Log blade, as shown in Figure 7.51.

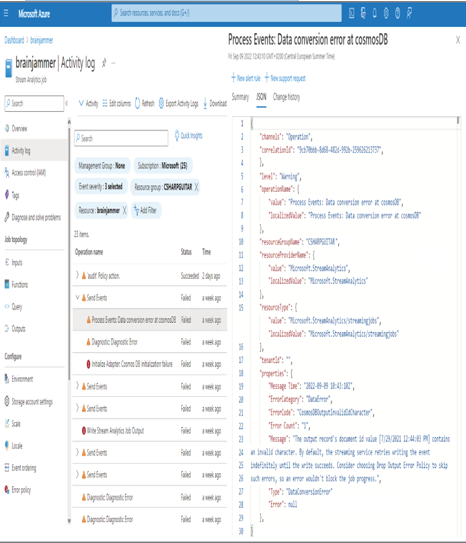
FIGURE 7.51 Azure Stream Analytics Activity log warnings and errors

Line 21 of the Send Events operation warning message shows a CosmosDBOutputInvalidIdCharacter error. After some analysis, it turns out Azure Cosmos DB does not like the timestamp used as the document ID in that format. The Azure Stream Analytics query had to be changed to get the data into the correct format so that the output could handle it. If you look back at the query for Exercise 7.9, you will notice some special handling of the ReadingDate column in the query. The reason for that query pattern was a result of the solution to this exception.

The last part of the topics necessary for designing and configuring exception handling is just that. When an exception happens, Azure Stream Analytics offers two options, Retry and Drop. Look again at Figure 7.51; there is a navigation menu option named Error Policy. On that blade there are two options, Retry and Drop. Retry is the default and means the data stream processor will retry writing the message to the output until it succeeds, indefinitely. This setting will ultimately block the output of that and any other message streaming to that point. If you experience a scenario where the data stream has stopped flowing, then there is a blockage, and you need to find and resolve the exception before it begins working again. The other option is to drop the message and not process it. If you choose this option, you need to realize that the message cannot be recovered or replayed, so it will be purged and lost.

Summary – Design and Implement a Data Stream Processing Solution

This chapter focused on the design and development of a stream processing solution. You learned about data stream producers, which are commonly IoT devices that send event messages to an ingestion endpoint hosted in the cloud. You learned about stream processing products that read, transform, and write the data stream to a location for consumers to access. The location of the data storage depends on whether the data insights are required in real time or near real time. Both scenarios flow through the speed layer, where real‐time insights flow directly into a consumer like Power BI and near real‐time data streams flow into the serving layer. While the insights are in the serving layer, additional transformation can be performed by batch processing prior to consumption. In addition to the time demands on your streaming solution, other considerations, such as the data stream format, programming paradigm, programming language, and product interoperability, are all important when designing your data streaming solution.

Azure Stream Analytics has the capacity to process data streams in parallel. Performing work in parallel increases the speed in which the transformation is completed. The result is a faster gathering of business insights. This is achieved using partition keys. Partition keys provide the platform with information that is used to group together the data and process it on a dedicated partition. The concept of time is very important in data stream solutions. Arrival time, event time, checkpoints, and watermarks all play a very important role when interruptions to the data stream occur. You learned that when an OS upgrade, node exception, or product upgrade happens, the platform uses these time management properties to get your stream back on track without losing any of the data. The replaying of data streams is possible if you have created or stored the data required to replay them. There are no such data archival features on the data streaming platform to achieve this.

There are many metrics you can use to monitor the performance of your Azure Stream analytics job. For example, the Resource Utilization, Event Counts, and Watermark Delay metrics can help you determine why the stream results are not being processed as expected or at all. Diagnostic settings, alerts, and Activity logs can also help determine why your stream processing is not achieving the expected results. Once you determine the cause of the problem, you can increase the capacity by scaling, configuring the error policy, or changing the query to fix a bug.

Handle Interruptions – Design and Implement a Data Stream Processing Solution

As previously mentioned, the platform will handle data stream interruptions when caused by a node failure, an OS upgrade, or product upgrades. However, how can you handle an exception that starts happening unexpectedly? Look back at Figure 7.51 and notice an option named + New Alert Rule, just above the JSON tab. When you select that link, a page will render that walks you through the configuration of actions to be taken when an operation completes with a Failed status. This is covered in more detail in Chapter 10.

Ingest and Transform Data

Chapter 5 covered data ingestion and transformation in detail. In this chapter you learned how a data stream is ingested and how it can then be transformed. Technologies like Azure Event Hubs, Azure IoT Hub, and Azure Data Lake Storage containers are all very common products used for data stream ingestion. Azure Stream Analytics and Azure Databricks receive the data stream and then process the data. The processed data stream is then passed along to a downstream consumer.

Transform Data Using Azure Stream Analytics

Exercise 7.5 is a very good example of transforming data that is ingested from a stream. You created a tumbling window size of 5 seconds, and all the brain wave readings that were received in that time window were transformed. The query that transformed those brain wave readings calculated the median for each frequency. Once calculated, the median values were compared against estimated frequency values for the meditation scenario, and the result was then passed to Power BI for real‐time visualization.

Monitor Data Storage and Data Processing

The monitoring capabilities concerning stream processing are covered in Chapter 9. This section is added to help you navigate through the book while referring to the official online DP‐203 exam objectives/Exam Study Guide, currently accessible from https://learn.microsoft.com/en-us/certifications/exams/dp-203.

Monitor Stream Processing

You will find some initial information about monitoring stream processing in the “Monitor for Performance and Functional Regressions” section in this chapter. You will find a more complete discussion of this topic in Chapter 9, in the section with the same name, “Monitor for Performance and Functional Regressions.”

Implement a Data Auditing Strategy – Keeping Data Safe and Secure

Before you can design and implement a data security solution, you need to discover and classify your data. As you learned, Microsoft Purview has features for discovering, classifying, and proposing a sensitivity level. In Exercise 8.2 you provisioned a Microsoft Purview account, viewed the Collection Admins role assignments, and added a few collections. In Exercise 8.3 you will perform a scan that discovers data assets within the targeted collection and identifies whether they meet basic classification and sensitivity levels. Before you begin Exercise 8.3, it is important to call out three security actions you took in the previous two exercises that are required for Exercise 8.3 to work. Recall step 4 in Exercise 8.1, where you created an AKV secret named azureSynapseSQLPool that contains the password for your Azure Synapse Analytics dedicated SQL pool.

You will configure Microsoft Purview to use this Azure Key Vault secret to access and analyze the assets within that dedicated SQL pool. In Exercise 8.2, step 2, you validated that your account was in the Collection Admins group on the Role Assignments tab for the root collection. Additionally, in step 5 of Exercise 8.2 you granted Get and List permissions to the Azure Key Vault secret to your Microsoft Purview account identity. As you will configure in Exercise 8.3, one more permission is required to make this work for your Azure Synapse Analytics dedicated SQL pool. The same Microsoft Purview account identity that you granted access to Azure Key Vault must be added to the Reader role via Access control (IAM) on your Azure Synapse Analytics workspace.

Note that each Azure product that you want to perform a scan on from Microsoft Purview will likely have its own set of permissions and role access requirements. You will need to find this out using online documentation on a product‐by‐product basis. Exercise 8.3 and previous exercises provide the instructions to perform a scan on an Azure Synapse Analytics dedicated SQL pool. Complete Exercise 8.3 to gain hands‐on experience with this product and feature.

Design Security for Data Policies and Standards – Keeping Data Safe and Secure

When you begin thinking about security, many of the requirements will be driven by the kind of data you have. Is the data personally identifiable information (PII), such as a name, email address, or physical address, that is stored, or does the data consist of historical THETA brain wave readings? In both scenarios you would want some form of protection from bad actors who could destroy or steal the data. The amount of protection you need should be identified by a data security standard. The popular Payment Card Industry (PCI) standard seeks to define the kinds of security mechanisms required for companies who want to transmit, process, and store payment information. There are numerous varieties of PCI that can be helpful as a baseline for defining your own data security standards based on the type of data your data analytics solution ingests, transforms, and exposes. For example, the standard might identify the minimum version of TLS that consumers must use when consuming your data. Further examples of data security standards are that all data columns must be associated with a sensitivity level, or that all data that contains PII must be purged after 120 days.

A data security policy contains the data security standards component along with numerous other sections that pertain to security. A data security policy can be used to identify security roles and responsibilities throughout your company so that it is clear who is responsible for what. For example, what aspects of data security does a certified Data Engineer Associate have? At what point does data security merge into the role of a Security Engineer? A data security policy also accounts for the procedures when there are security violations or incidents. How to classify data, how to manage access to data, the encryption of data, and the management and disposal of data are all components that make up a data security policy. Some basic security principals—such as that there be no access to customer data by default and to always grant the lowest level of privileges required to complete the task—are good policies to abide by. Most of these security aspects are covered in more detail later in this chapter. After completing this chapter, you will be able to contribute to the creation of a data security policy and strategy.

As you begin the effort to describe and design your data security model, consider approaching it from a layered perspective. Figure 8.1 represents a layered security model. The first layer focuses on network security. In this chapter you will learn about virtual networks (VNets), network security groups (NSGs), firewalls, and private endpoints, each of which provides security at the networking layer.

FIGURE 8.1 Layered security

The next layer is the access management layer. This layer has to do with authentication and authorization, where the former confirms you are who you say and the latter validates that you are allowed to access the resource. Common tools on Azure to validate that a person is who they claim to be include Azure Active Directory (Azure AD), SQL authentication, and Windows Authentication (Kerberos), which is in preview at the time of writing. Managing access to resources after authentication is successful is implemented through role assignments. A common tool for this on Azure is role‐based access control (RBAC). Many additional products, features, and concepts apply within this area, such as managed identities, Azure Key Vault, service principals, access control lists (ACLs), single sign‐on (SSO), and the least privilege principle. Each of these will be described in more detail in the following sections.

The kind of business a company performs dictates the kind of data that is collected and stored. Companies that work with governments or financial institutions have a higher probability of attempted data theft than companies that measure brain waves, for example. So, the threat of a security breach is greater for companies with high‐value data, which means they need to take greater actions to prevent most forms of malicious behaviors. To start with, performing vulnerability assessments and attack simulations would help find locations in your security that have known weaknesses. In parallel, enabling threat detection, virus scanners, logging used for performing audits, and traceability will reduce the likelihood of long‐term and serious outages caused by exploitation. Microsoft Defender for Cloud can be used as the hub for viewing and analyzing your security logs.

The last layer of security, information protection, is applied to the data itself. This layer includes concepts such as data encryption, which is typically applied while the data is not being used (encryption‐at‐rest) and while the data is moving from one location to another (encryption‐in‐transit). Data masking, the labeling of sensitive information, and logging who is accessing the data and how often, are additional techniques for protecting your data at this layer.

Table 8.1 summarizes the security‐related capabilities of various Azure products.

TABLE 8.1 Azure data product security support

FeatureAzure SQL DatabaseAzure Synapse AnalyticsAzure Data ExplorerAzure DatabricksAzure Cosmos DB
AuthenticationSQL / Azure ADSQL / Azure ADAzure ADTokens / Azure ADDB users / Azure AD
Dynamic maskingYesYesYesYesYes
Encryption‐at‐restYesYesYesYesYes
Row‐level securityYesYesNoYesNo
FirewallYesYesYesYesYes

Azure data products enable you to configure each layer of the security model. The Azure platform provides many more features and capabilities to help monitor, manage, and maintain the security component of your data analytics solution. The remainder of this chapter provides details about these features and capabilities. But before you continue, complete Exercise 8.1, where you will provision an Azure Key Vault resource. Azure Key Vault is a solution that helps you securely store secrets, keys, and certificates. Azure Key Vault comes with two tiers, Standard and Premium, where the primary difference has to do with hardware security module (HSM) protected keys. HSM is a key protection method, which is a physical device dedicated to performing encryption, key management, authentication, and more. HSM is available in the Premium tier only. A software‐based key protection method is employed when a Standard tier is utilized. HSM provides the highest level of security and performance and is often required to meet compliance regulations. This product plays a very significant role in security, so learning some details about it before you continue will increase your comprehension and broaden your perspective.

Design Data Encryption for Data at Rest and in Transit – Keeping Data Safe and Secure

Encryption is a very scientific, mathematics‐heavy concept. The internals are outside the scope of this book, but in simple terms when data is encrypted, it looks like a bunch of scrambled letters and numbers that are of no value. The following is an example of the word csharpguitar using the key created in Exercise 8.1:

 p0syrFCPufrCr+9dN7krpFe7wuwIeVwQNFtySX0qaX3UcqzlRifuNdnaxiTu1XgZoKwKmeu6LTfrH
 rGQHq4lDClbo/KoqjgSm+0d0Ap/y2HR34TFgoxTeN0KVCoVKAtu35jZ52xeZgj1eYZ9dww2n6psGG
 nMRlux/z3ZDvm4qlvrv55eAoSawbCGWOql3mhdfHFZZxLBCN2eZzvBpaTSNaramME54ELMr6ScIJI
 ITq6XJYTFH8BGvPaqhfTTO4MbizwenpijIFZvdn3bzQGbnPElht0j+EQ7aLvWOOyzJjlKcR8MN4jO
 oYNULCZTBi/BVvlhYpUsKxxN+YW27POMAw==

There is no realistic method for anyone or any computer to revert that set of characters back into the original word. That is the power of encryption implemented using public and private keys. Only by having access to the private key can one make sense of that character sequence. The only means for decryption is to use the az keyvault key decrypt Azure CLI cmdlet or a REST API that has access to the private key. This leads well into two very important security concepts that pertain greatly to the storage of data on Azure: encryption‐at‐rest and encryption‐in‐transit.

Data stored in an Azure storage account is encrypted by default. No action is required by you to encrypt your data that is stored in a container. It is encrypted even if it is not used, which is where the name encryption‐at‐rest comes from. The data is simply stored, idle, doing nothing, but is secured by encryption. This kind of protection is intended to defend against a bad actor getting access to the physical hard drive that contains data. When the bad actor attempts to access the data, they will see only the scrambled characters. If they do not have the associated keys, which should only be accessible in a key vault, there is no chance of decrypting the data. Therefore, your data is safe, even when it is resting and not being used. Back in Exercise 3.1 where you created an Azure storage account and an ADLS container, there was a tab named Encryption. That tab includes two radio buttons, as shown in Figure 8.12. The default was to use a Microsoft‐Managed Key (MMK) for the encryption‐at‐rest operation; the other optiom is named Customer‐Managed Key (CMK). If you select CMK, then you can reference a key you have created in an Azure Key Vault to use as a default encryption key.

Storage account encryption is available for customers who need the maximum amount of security due to compliance or regulations. Also notice the Enable Infrastructure Encryption check box. When this box is selected, the data stored in the account is doubly encrypted. Double encryption is available for both data at rest and data in transit. Instead of being encrypted with just one key, the data is encrypted with two separate keys, the second key being implemented at the infrastructure level. This is done for scenarios where one of the encryption keys or algorithms is compromised. When Enable Infrastructure Encryption is selected and one of the encryption keys is compromised, your data is still encrypted with 256‐bit AES encryption by the other key. The data remains safe in this scenario. Another common encryption technology on the Azure platform that is targeted towards databases is Transparent Data Encryption (TDE). TDE protects data at rest on SQL Azure databases, Azure SQL data warehouses, and Azure Synapse Analytics SQL pools. The entire database, data files, and database backups are encrypted using an AES encryption algorithm by default, but like Azure Storage, the encryption key can be managed by the customer or by Microsoft and stored in an Azure key vault.

FIGURE 8.12 Azure storage account encryption type

The opposite of resting is active, which can be inferred to data being retrieved from some remote consumer. As the data moves from the location where it is stored to the consumer, the data can be vulnerable to traffic capture. This is where the concept of encryption‐in‐transit comes into scope. You encrypt data in transit by using TLS 1.2, which is currently the most secure and widely supported version. As previously mentioned, TLS is achieved by using an x509 certificate in combination with the HTTP protocol. Consider the following common Azure product endpoints:

In all cases, the transfer of data happens using HTTPS, meaning the data is encrypted while in transit between the service that hosts it and the consumer who has authorization to retrieve it. When working with Linux, the protocol to use is secure shell (SSH), which ensures the encryption of data in transit; HTTPS is also a supported protocol. An additional encryption concept should be mentioned here: encryption‐in‐use. This concept is implemented using a feature named Always Encrypted and is focused on the protection of sensitive data stored in specific columns of a database. Identification numbers, credit card numbers, PII, and need‐to‐know data are examples of data that typically resides in the columns of a database. This kind of encryption, which is handled client‐side, is intended to prevent DBAs or administrators from viewing sensitive information when there is no business justification to do so.

The final topic to discuss in the section has to do with the WITH ENCRYPTION SQL statement. In Exercise 2.3 you created a view using a statement similar to the following:

 CREATE VIEW [views].[PowThetaClassicalMusic]

In Exercise 5.1 you created a stored procedure using the following command:

 CREATE PROCEDURE brainwaves.uspCreateAndPopulateFactReading

Each of those statements can be used by placing the WITH ENCRYPTION SQL directory after the CREATE command, like the following:

CREATE VIEW [views].[PowThetaClassicalMusic] WITH ENCRYPTION
 CREATE PROCEDURE brainwaves.uspCreateAndPopulateFactReading WITH ENCRYPTION

If you then attempt to view the text for the stored procedure, you will not see it; instead, you will see a message explaining that it is encrypted. Using the WITH ENCRYPTION statement provides a relatively low level of security. It is relatively easy to decrypt for technically savvy individuals; however, it is quick and simple to implement, making it worthy of consideration.

Create a Microsoft Purview Account – Keeping Data Safe and Secure

  1. Log in to the Azure portal at https://portal.azure.com ➢ enter Purview in the search box in the upper middle of the browser ➢ select Microsoft Purview account ➢ select the + Create menu option ➢ select the subscription ➢ select the resource group ➢ enter a Microsoft Purview account name (I used brainjammer) ➢ select a region ➢ leave the managed resources as the default ➢ navigate through the other tabs ➢ leave the defaults ➢ click the Review + Create button ➢ and then click Create.
  2. Once provisioning is complete, navigate to the Microsoft Purview Overview blade ➢ select the Open link to open the Microsoft Purview Governance Portal ➢ select the Data Map hub ➢ select Collections ➢ and then select the Role Assignments tab, as shown in Figure 8.7. Make sure your account is within the Collection Admins group; if not, add it.

FIGURE 8.7 Microsoft Purview default root collection

  1. Click the + Add a Collection menu button ➢ enter Data Engineering in the Display Name text box ➢ enter your account into the Collection Admins group ➢ click the Create button ➢ and then select the root collection (for example, brainjammer) to do the same again, but this time enter R&D in the Display Name text box.
  2. Select the Sources navigation link ➢ click the Register menu button ➢ select the Azure Data Lake Storage Gen2 resource ➢ click Continue ➢ enter a name (I used ADLS‐csharpguitar) ➢ select the subscription that contains the ADLS container you created in Exercise 3.1 ➢ select the storage account name ➢ select Data Engineering from the Select a Collection drop‐down list ➢ click the Register button ➢ click the Register button again ➢ select Azure Synapse Analytics ➢ click Continue ➢ enter a name (I used ASA‐csharpguitar) ➢ select the subscription that contains the Azure Synapse Analytics workspace you created in Exercise 3.3 ➢ select R&D from the Select a Collection drop‐down list ➢ and then click Register. The result should resemble Figure 8.8.

FIGURE 8.8 Microsoft Purview Map view

  1. Navigate to the Azure Key Vault you created in Exercise 8.1 ➢ select Access Policies ➢ click the + Create menu button ➢ check the Get and List operations in the Secret permissions / Secret Management Operations section ➢ click Next ➢ search for and select the Microsoft Purview account name you just provisioned ➢ click the Next button twice ➢ and then click Create.

The additional registration of the Power BI workspace and an Azure SQL database are for effect only at this point. Feel free to register additional or different resources to your collections. The provisioning of the account was straightforward. You were again confronted by the concept of a Managed Resource group, which you experienced in Exercise 3.3. As a reminder, this resource group contains Azure products required by the provisioned resource. In this case, an Azure storage account is required and was stored in the provisioned Managed Resource group. In Exercise 8.2 you configured two collections, Data Engineering and R&D. The Data Engineering collection has the Power BI workspace and the ADLS container associated with it, while the R&D collection has the Azure Synapse Analytics workspace and an Azure SQL database. The structure of the collection hierarchy and associated sources provides some context to approach the policies, compliance, and governance constraints placed on them. Sorting together which datastores are necessary per collection provides you the means for setting policies on those resources based on the individuals affiliated with those groups. You did not perform the activity of scanning in Exercise 8.2 because of the requirement of managed identities. This will be discussed in the “Implement a Data Auditing Strategy” section.

Create an Azure Key Vault Resource – Keeping Data Safe and Secure-1

  1. Log in to the Azure portal at https://portal.azure.com ➢ click the menu button on the upper left of the browser ➢ click + Create a Resource ➢ select Security from the Categories section ➢ select Key Vault ➢ select the subscription ➢ select the resource group ➢ enter a key vault name ➢ select a region ➢ and then select a pricing tier (I used Standard). Leave the remaining options as the defaults.
  2. Click the Next button ➢ leave the defaults on the Access Policy tab ➢ select the check box next to your user identity in the Access Policies section ➢ click the Edit button ➢ observe the default Key, Secret, and Certificate default permissions ➢ click Next ➢ leave the defaults on the Networking tab ➢ click the Review + Create button ➢ and then click Create.
  3. Once the key vault is provisioned, navigate to it ➢ select Keys from the navigation menu ➢ select the + Generate/import menu link ➢ and then enter a name (I used brainjammerKey). The configuration should resemble Figure 8.2. The Elliptic Curve Name radio buttons show the available algorithms.

FIGURE 8.2 Creating an Azure Key Vault key

  1. Click the Create button ➢ select the Secrets navigation item ➢ click the + Generate/Import menu option ➢ enter a name (I used azureSynapseSQLPool) ➢ and then enter a secret value (I used the password of my Azure Synapse Analytics dedicated SQL pool). The configuration should resemble Figure 8.3.

FIGURE 8.3 Creating an Azure Key Vault secret

  1. Click the Create button ➢ select the Certificates navigation item ➢ click the + Generate/Import menu option ➢ enter a certificate name (I used brainjammerCertificate) ➢ and then enter a subject value (I used “CN=brainjammer.net”). The configuration should resemble Figure 8.4.

FIGURE 8.4 Creating an Azure Key Vault certificate

  1. Click Create.

Exercise 8.1 is straightforward in that you should recognize most of the options and understand what they mean. A few features and concepts, however, are worthy of discussion. On the Access Policy tab, you likely noticed the option to manage access by either Key Vault access policy or Azure role‐based access control (RBAC). The Key Vault access policy enables you to grant service principals, users, applications, or user groups access to specific operations on the keys, secrets, and certificates hosted in the key vault—for example, those shown in Figure 8.5. Figure 8.5 is similar to what you saw in step 2 of Exercise 8.1 when viewing the default permissions.

FIGURE 8.5 Vault access policy operations

With the RBAC approach, you grant a user or group access to the key vault using a role. There are numerous built‐in key vault roles, such as Key Vault Administrator, Key Vault Reader, and Key Vault Secrets User. If any of the built‐in roles do not meet your requirements, you can create a custom role, using a JSON document similar to the following:

Design Row‐Level and Column‐Level Security – Keeping Data Safe and Secure

In a relational database, a table is made up of rows of data. Each row can have many columns. Once your data has been ingested and transformed and is ready for consumption, you may need to apply some additional security at the row or column level. Row‐level security (RLS) is very similar to a filter commonly implemented using the WHERE clause. This works fine as long as no one has direct access to the data and can run queries that circumvent this level of projection. In this case, if you need to restrict access on a row level, and you have clients that connect directly to your database, then you need to apply RLS. Implementing RLS requires what is called a FILTER PREDICATE, which is applied using theCREATE SECURITY POLICY statement. Consider a scenario where you have implemented a global brain wave repository that allows anyone to upload their brain wave readings to your datastore for processing and data analytics. Consider taking it one step further and provide the option for those individuals to perform analytics on their scenarios. As the platform owner, you would want to see all readings from all those who have uploaded data; however, you would want to restrict individuals’ access to only their data. RLS is a means for achieving just that. Consider the following SQL statement:
 CREATE SECURITY POLICY BrainwavesFilter_ext
 ADD FILTER PREDICATE Security.fn_securitypredicate(brainwaveProducer)
 ON dbo.Brainwaves_ext
 WITH (STATE = ON);

The statement creates a policy named BrainwavesFilter_ext and adds a predicate based on a value stored on a table named Brainwave_ext. The value in column brainwaveProducer is the user account ID of the person who uploaded brain waves. When CRUD queries are executed against the Brainwave_ext table, the policy uses the predicate to filter, change, remove, insert, and/or deliver the data for the user who uploaded it.

Another feature that you can apply to the data is called column‐level security. Recall from the SUBJECTS table a few columns are worthy of a Confidential sensitivity level. Columns like USERNAME, ZIPCODE, EMAIL, and BIRTHDATE contain data that should not be accessible to the public or generally available. If you have a user in your Azure Synapse Analytics dedicated SQL pool named brainjammer and do not want that user to have access to these columns, you can execute the following command to exclude the columns from the list:

 GRANT SELECT ON SUBJECTS
   (ID, FIRSTNAME, LASTNAME, EMAIL, COUNTRY, CREATE_DATE) TO brainjammer;

If that user then attempts the following SELECT statement, an error would be rendered stating that access is denied:

 SELECT * FROM SUBJECTS

In the Implement Row‐Level and Column‐Level Security section you will perform an exercise and experience column‐level security firsthand.