Author: Terry Decker

Design for Data Privacy – Keeping Data Safe and Secure

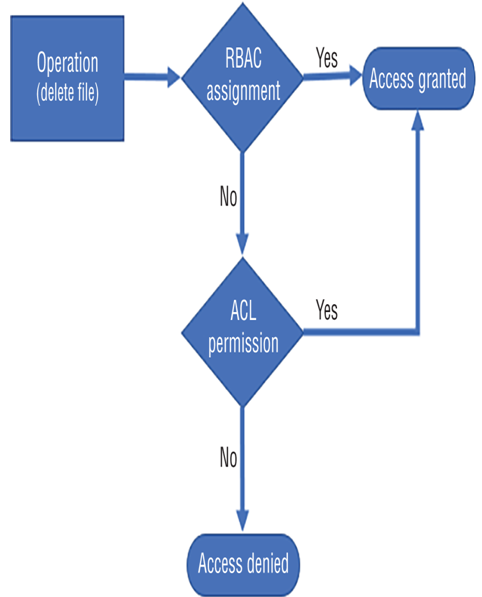
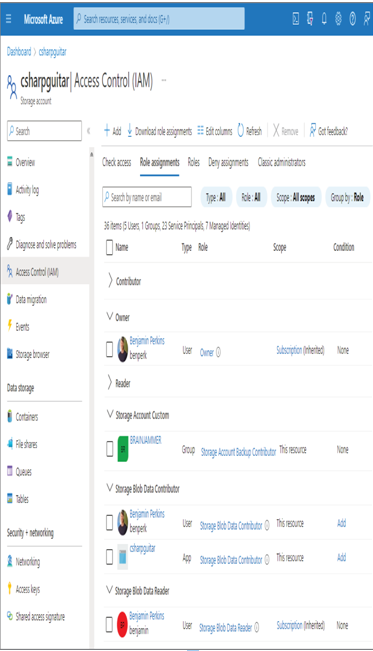
Keeping data private depends primarily on two factors. The first factor is the implementation of a security model, like the layered approach illustrated in Figure 8.1. Implementing a security model has the greatest probability of preventing malicious behaviors and bad actors from having an impact on your data and your IT solution in general. The tools and features that can help prevent those scenarios include VNets, private endpoints, Azure Active Directory, RBAC, and Azure threat protection functionality. The second factor has to do with the classification and labelling of the data, which needs to be kept private and requires an additional level of protection. A very helpful tool is linked to your SQL pools and other Azure SQL products: Data Discovery & Classification. As shown in Figure 8.10, when Data Discovery & Classification. is selected, the database is analyzed for content that might benefit with some additional form of classification and sensitivity labeling.

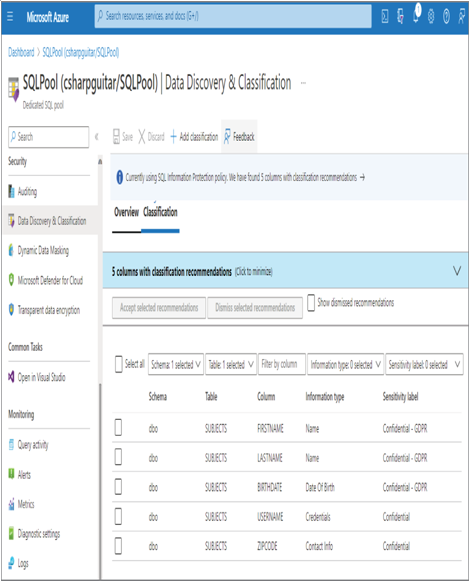
FIGURE 8.10 Data Discovery & Classification

Notice that selecting the Data Discovery & Classification navigation menu item resulted in a scanning of the dbo schema on the Azure Synapse Analytics dedicated SQL Pool. A table named SUBJECTS was discovered to potentially contain PII data, and the tool recommended the sensitivity label and the classification of the data in the Information Type column. The SUBJECTS schema is located on GitHub in the Chapter08 directory. Recognize that you are the expert when it comes to the data hosted on your database. Information stored in columns may be named in a way that results in it not being recognized as requiring additional protection. For this scenario, you can use the + Add Classification menu button to add both the classification and sensitivity label. When you select the + Add Classification menu button, the pop‐up window in Figure 8.11 is rendered.

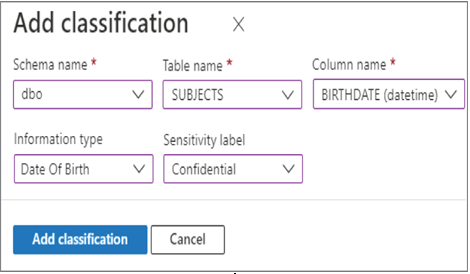
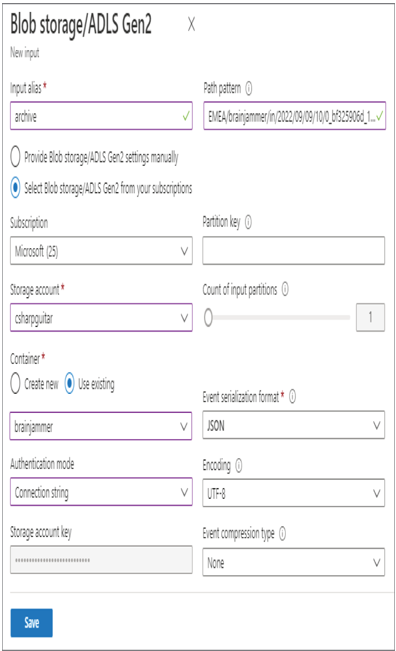
FIGURE 8.11 Data Discovery & Classification, Add Classification window

This feature exposes all the schemas, tables, and columns that exist on the database. After selecting add classification, you can then set the classification and sensitivity labels. In this case, the SUBJECTS table contains the column named BIRTHDATE and is classified as Date Of Birth related. The Sensitivity Label drop‐down is set to Confidential, which means that some kind of protective measure should be taken to control who can access the data. The other sensitivity levels are Public, General, and Highly Confidential. Reading through those examples, you can conclude that a sensitivity level of Public would likely not need any masking or encryption. As you progress through those different levels, the amount of security also increases with the maximum level of auditing, encryption, and access restrictions applied to the dataset as the Highly Confidential sensitivity level.

Data privacy also has to do with compliance regulations. There are many scenarios where data that is captured in one country cannot be stored outside the boundaries of that country. Data residency is an important point to consider when you are configuring redundancies into your data analytics solution. It is very common on Azure that datacenters are paired together and act as a disaster recovery option in case of catastrophic events. By default, for example, the West Europe region’s paired region is North Europe, and both are physically located in different countries. If your scenario requires that your data must remain in the country where it is collected in order to be compliant with your industry regulations, then take those appropriate actions. This capability is built into the platform for many Azure products, and when paired regions are located in different countries, you will be presented the option to disable this.

Design and Create Tests for Data Pipelines – Design and Implement a Data Stream Processing Solution

The data pipeline used in most examples in this chapter has included a data producer, an Event Hubs endpoint, and an Azure Stream Analytics job. Those components create the data, ingest the data, and then process the data stream. The processed data then flows into datastores like ADLS, an Azure Synapse Analytics SQL pool, Azure Cosmos DB, and Power BI. All those different parts make up the data pipeline.

To design a test for the data pipeline, you must identity the different components, which were mentioned in the preceding paragraph. The next step is to analyze each component to determine exactly what the data input format is, what is used to process that data, and what the output should be. If you take the BCI that produces brain wave readings, for example, the input consists of analog vibrations originating from a brain. The BCI is connected to a computer via Bluetooth, and a program converts the analog reading to a numeric value, which is then formatted into a JSON document and streamed to an event hub. Therefore, changes to the code that captures, transforms, and streams the brain wave readings to the event bub must be tested through the entire pipeline. Data is not modified as it flows through the event hub, so the next step in the pipeline to analyze is the Azure Stream Analytics job query. If the format of the incoming data stream had been changed, a change to the query would be required. For example, the addition of a new column to the data event message would require a change to the query. The final step is to validate that the output of the stream processing had an expected result on all downstream datastores that receive the processed data content.

In most mid‐ to large‐size projects, you would perform these tests in a testing environment that has an exact replica of the production data pipeline. As you learned in Chapter 6, you can use an Azure DevOps component named Azure Test Plans for more formal new features and regression testing capabilities. You will learn more about Azure Test Plans in Chapter 9, “Monitoring Azure Data Storage and Processing,” and Chapter 10, “Troubleshoot Data Storage Processing.”

Monitor for Performance and Functional Regressions

The “Configure Checkpoints/Watermarking During Processing” section discussed some metrics that are useful for monitoring performance, such as Watermark Delay, Resource Utilization, and Events Count (refer to Figure 7.44). Many other metrics are available. The following are a few of the more interesting metrics:

  • Backlogged Input Events
  • CPU % Utilization
  • Data Conversion Errors
  • Early Input Events
  • Input Events
  • Last Input Events
  • Out of order Events
  • Output Events
  • Runtime errors
  • SU (Memory) % Utilization

Each of these metrics can potentially help you find out the cause of issues your Azure Stream Analytics job is having. A regression means that a bug in your code that was previously fixed has been reintroduced into the application. From an Azure Stream Analytics perspective, this would happen in the query, or, if your job contains a function, the code may have been corrupted in that area of the processing logic. To help determine when this happened, you can review the Activity Log blade, which provides a list of changes made over a given time frame. If you have your queries and function code in a source code repository, then you could also take a look in the file history to see who changed and merged the code, when, and how.

Design a Data Auditing Strategy – Keeping Data Safe and Secure

When you take an audit of something, it means that you analyze it and gather data about the data from the results. Many times the findings result in actions necessary to resolve inefficient or incorrect scenarios. What you analyze, what you are looking for, and what kind of analysis you need to perform are based on the requirements of the object being audited. The data management perspective (refer to Figure 5.41) includes disciplines such as quality, governance, and security. Each of those are good examples of scenarios to approach when creating a data auditing strategy. From a data quality perspective, you have been exposed to cleansing, deduplicating, and handling missing data using the MAR, MCAR, and MNAR principles, as discussed in Chapter 5, “Transform, Manage, and Prepare Data,” and Chapter 6, “Create and Manage Batch Processing and Pipelines.” This chapter focuses on the governance and security of data and how you can learn to design and implement strategies around those topics.

Governance encompasses a wide range of scenarios. You can optimize the scope of governance by identifying what is important to you, your business, and your customers. The necessary aspects of data governance include maintaining an inventory of data storage, enforcing policies, and knowing who is accessing what data and how often. The Azure platform provides products to achieve these aspects of data governance (refer to Figure 1.10). Microsoft Purview, for example, is used to discover and catalog your cloud‐based and estate‐based data estate. Azure Policy provides administrators the ability to control who and how cloud resources are provisioned, with Azure Blueprints helping to enforce that compliance. Compliance is a significant area of focus concerning data privacy, especially when it comes to PII, its physical location, and how long it can be persisted before purging. In addition to those products, you can find auditing capabilities built into products like Azure Synapse Analytics and Azure Databricks. When auditing is enabled on those two products specifically, failed and successful login attempts, SQL queries, and stored procedures are logged by default. The audit logs are stored into Log Analytics workspace for analysis, and alerts can be configured in Azure Monitor when certain behaviors or activities are recognized. Auditing is applied across the entire workspace, when enabled, and can be extended to log any action performed that affects the workspace.

Microsoft Azure provides policy guidelines for many compliance standards, including ISO, GDPR, PCI DSS, SOX, HIPPA, and FISMA, to name just a few of the most common standards. From a security perspective, you have seen the layered approach (refer to Figure 8.1) and have learned about some of the information protection layer features, with details about other layers coming later. Data sensitivity levels, RBAC, data encryption, Log Analytics, and Azure Monitor are all tools for protecting, securing, and monitoring your data hosted on the Azure platform.

Microsoft Purview

Microsoft Purview is especially useful for automatically discovering, classifying, and mapping your data estate. You can use it to catalog your data across multiple cloud providers and on‐premises datastores. You can also use it to discover, monitor, and enforce policies, and classify sensitive data types. Purview consists of four components: a data map, a data catalog, data estate insights, and data sharing. A data map graphically displays your datastores along with their relationships across your data estate. A data catalog provides the means for browsing your data assets, which is helpful with data discovery and classification. Data estate insights present an overview of all your data resources and are helpful for discovering where your data is and what kind of data you have. Finally, data sharing provides the necessary features to securely share your data internally and with business customers. To get some hands‐on experience with Microsoft Purview, complete Exercise 8.2, where you will provision a Microsoft Purview account.

Design to Purge Data Based on Business Requirements – Keeping Data Safe and Secure

The primary difference between purging and deleting has to do with whether or not the data is gone for good. When you purge data, it means there is no way to recover it. If something called a soft delete is enabled, it means that the data can be recovered during a preconfigured timeframe. After that timeframe, the data will be purged. Soft‐deleted data continues to consume storage space in your database or on your datastore, like an Azure storage container. The storage consumption is only freed when the data is purged. Like all scenarios related to retention and data deletion discussed up to now, you need to first decide which data has a sensitivity level that must adhere to a retention policy. Once you determine which data must be deleted, you need to determine at what age the data should be removed. After identifying those two pieces of information, you might consider deleting the data from your database using the DELETE SQL command. The following command removes all the data from the SUBJECTS table where the CREATE_DATE value is 3 months old from the current date:

 DELETE FROM SUBJECTS WHERE CREATE_DATE < DATEADD(month, -3, GETDATE())

When the amount of data is large, this kind of query can have a significant impact on performance. The impact can result in latency experienced by other data clients inserting, updating, or reading data from the same database. A very fast procedure for removing data is to place the data onto a partition that is defined by the column that defines the lifecycle of the data, for example, using the CREATE_DATE in the SUBJECTS table as the basis for a partition. When the data on that partition has breached the retention threshold, remove the partition, and the data is removed. Another approach is to select the data you want to keep, use the result to insert it into another table, and then switch the tables. This is achieved using CTAS, which was introduced in Chapter 2, “CREATE DATABASE dbName; GO,” along with the partitioning concept mentioned previously. The following SQL snippet is an example of how to achieve the purging of data without using the DELETE SQL command:

 SELECT * INTO SUBJECTS_NEW FROM SUBJECTS 
 WHERE CREATE_DATE> DATEADD(month, -3, GETDATE())
 RENAME OBJECT SUBJECTS TO SUBJECTS_OLD
 RENAME OBJECT SUBJECTS_NEW TO SUBJECTS
 DROP TABLE SUBJECTS_OLD

The SELECT statement retrieves the data with a creation date that is not older than 3 months and places the data into a new table. The existing primary table named SUBJECTS is renamed by appending _OLD to the end. Then the newly populated table that was appended with _NEW is renamed to the primary table name of SUBJECTS. Lastly, the table containing data that is older than 3 months is dropped, resulting in its deletion.

Replay an Archived Stream Data in Azure Stream Analytics – Design and Implement a Data Stream Processing Solution

  1. Log in to the Azure portal at https://portal.azure.com➢ navigate to the Azure Stream Analytics job you created in Exercise 3.17➢ select Input from the navigation menu ➢ select the + Add Stream Input drop‐down menu ➢ select Blob Sorage/ADLS Gen2 ➢ provide an input alias name (I used archive) ➢ select Connection String from the Authentication Mode drop‐down list box ➢ select the ADLS container where you stored the output in Exercise 7.9➢ and then enter the path to the file into the Path Pattern text box, perhaps like the following. Note that the filename is shortened for brevity and is not the actual filename of the output from Exercise 7.9.
    EMEA/brainjammer/in/2022/09/09/10/0_bf325906d_1.json
  2. The configuration should resemble Figure 7.46. Click the Save button.

FIGURE 7.46 Configurating an archive input alias

  1. Select Query from the navigation menu ➢ enter the following query into the query window ➢ click the Save Query button ➢ and then start the job. The query is available in the StreamAnalyticsQuery.txt file located in the Chapter07/Ch07Ex10 directory on GitHub.
    SELECT Scenario, ReadingDate, ALPHA, BETA_H, BETA_L, GAMMA, THETA

INTO ADLS

FROM archive

  1. Wait until the job has started ➢ navigate to the ADLS container and location you configured for the archive input alias in step 1 ➢ download the 0_bf325906d_1.json file from the Chapter07/Ch07Ex10 directory on GitHub ➢ upload that file to the ADLS container ➢ and then navigate to the location configured for your ADLS Output alias. A duplicate of the file is present, as shown in Figure 7.47.

FIGURE 7.47 Archive replay data result

  1. Stop the Azure Stream Analytics job.

Exercise 7.10 illustrates how a file generated by the output of a data stream can be replayed and stored on a targeted datastore. You may be wondering why something like this would be needed. Testing new features, populating testing environments with data, or taking a backup of the data are a few reasons for archiving and replaying data streams. One additional reason to replay data is due to downstream systems not receiving the output. The reason for missing data might be an outage on the downstream system or a timing issue. If an outage happened downstream and data was missing from that store, it is likely easy to understand why: the data is missing because the datastore was not available to receive the data.

The timing issue that can result in missing data can be caused by the timestamp assigned to the data file. The timestamp for a data file stored in an ADLS container is in an attribute named BlobLastModifiedUtcTime. Consider the action you took in step 4 of Exercise 7.10, where you uploaded a new file into the location you configured as the input for your Azure Stream Analytics job. Nothing happened when you initially started the job, for example, at 12:33 PM. This is because files that already exist in that location will not be processed, because their timestamp is earlier than the start time of the Azure Stream Analytics job. When you start a job with a Job Output Start Time of Now (refer to Figure 7.18), only files that arrive after the time are processed. Once you added the file with a timestamp after the job had already been started, for example, 12:40 PM, it got processed.

The same issue could exist for downstream systems, in that the data file could arrive at a datastore but the processor is experiencing an outage of some kind. When it starts back up and is online, it may be configured to start processing files only from the current time forward, which would mean the files received during the downtime will not be processed. In some cases, it might be better and safer to replay the data stream instead of reconfiguring and restarting all the downstream systems to process data received while having availability problems. Adding the file in step 4 is not the only approach for getting the timestamp updated to the current time. If you open the file, make a small change that will not have any impact on downstream processing, and then save it, the timestamp is updated, and it will be processed. Perform Exercise 7.10 again but instead of uploading the 0_bf325906d_1.json file, make a small change to the file already in that directory and notice that it is processed and passed into the output alias ADLS container.

Azure Role‐Based Access Control – Keeping Data Safe and Secure

RBAC has been discussed in Chapter 1, “Gaining the Azure Data Engineer Associate Certification,” Chapter 3, “Data Sources and Ingestion,” and Chapter 5. What RBAC is, its purpose, and how it achieves controlling access to Azure resources should be somewhat clear at this point. This section will go into a bit more detail in the context of an Azure storage account that includes an ADLS container. The implementation of RBAC assignments for a specific resource is performed on the Access Control (IAM) blade for the given resource, as you have seen previously in Figure 1.28 and Figure 5.47. Figure 8.17 provides an example of the permission related to an Azure storage account.

FIGURE 8.16 RBAC and ACL permission evaluation

FIGURE 8.17 RBAC Access Control (IAM) Azure storage account

Notice that the Role Assignments tab is selected and that there are numerous roles and users within them. The roles highlighted are Owner, Storage Blob Data Contributor, and Storage Blob Data Reader. An account that is part of the Owner role has full access to manage all resources within the subscription. In addition to that, members with an Owner role can assign roles to other members. Notice that the Owner group does not grant access to the data layer. The user in the Owner group will not be able to read the data in the storage account with just the Owner permission, although it can look this way in the portal if the Account Key Authentication option is enabled, since the owner does have access to those keys. The permissions section of the JSON role resembles the following, which supports the preceding statement of having full access to all resources:

 “permissions”: [{ “actions”: [ “*” …]

The Storage Blob Data Contributor role concentrates specifically on the storage accounts in the subscription. The following permissions are granted for this role. Notice that members of this role can delete, read, and write blobs to all the containers within the storage account. You might notice the account of type app named csharpguitar. That is the identity linked to the Azure Synapse Analytics workspace and is the way in which it has been granted permission to the ADLS container used for the workspace.

 “permissions”: [{ “actions”: [
  “Microsoft.Storage/storageAccounts/blobServices/containers/delete”,
  “Microsoft.Storage/storageAccounts/blobServices/containers/read”,
  “Microsoft.Storage/storageAccounts/blobServices/containers/write”,
  “Microsoft.Storage/storageAccounts/blobServices/generateUserDelegationKey/action” …]

The ability to receive a SAS key for accessing data within the container is also granted to the Storage Blob Data Contributor role. This is achieved via the generateUserDelegationKey permission. The permissions for Storage Blob Data Reader role are as follows.

 “permissions”: [{ “actions”: [
  “Microsoft.Storage/storageAccounts/blobServices/containers/read”,
  “Microsoft.Storage/storageAccounts/blobServices/generateUserDelegationKey/action” …]

Looking at the permission details, it is easy to see the difference between the Storage Blob Data Contributor role and Storage Blob Data Reader role. There are no permissions for delete or write operations on any container in the storage account for the reader. As illustrated in more granular detail by Figure 8.18, when the member attempts to delete a blob, the platform checks the RBAC role. If the role has permission to delete the blob, then the operation is allowed. If the role does not have the delete permission but the member does have the ACL permission, then the operation will be performed. Without an ACL delete permission, the operation is denied due to access restriction.

FIGURE 8.18 RBAC role and ACL permission evaluation

Remember that if a built‐in RBAC role does not meet your requirements, you can create a custom RBAC role to include or exclude permissions. As shown in Figure 8.17, a group named BRAINJAMMER has been added to a custom RBAC role named Storage Account Custom. The group is an Azure Active Directory security group that contains members who are also part of the Azure Active Directory tenant. Those members receive the permissions associated with the RBAC custom permission list. As you know, adding individual members to RBAC roles at the resource level is the most inefficient approach. Instead, you should create groups that effectively describe the role, add members to it, and then add the group to the RBAC role. You will create this group in Exercise 8.12.

POSIX‐like Access Control Lists – Keeping Data Safe and Secure

There was an extensive discussion about ACLs in Chapter 1. Two concepts need to be summarized again: the types of ACLs and the permission levels. The two kinds of ACLs are Access and Default, and the three permission levels are Execute (X), Read (I), and Write (W). Access ACLs control the access to both directories and files, as shown in Table 8.2. Default ACLs are templates that determine access ACLs for child items created below a directory with applied access ACLs. Files do not have default ACLs, and changing the ACL of a parent does not affect the default or access ACLs of the child items. The feature to configure and manage ACLs is available on the Manage ACL blade for a given ADLS container, as shown in Figure 8.19.

FIGURE 8.19 The Manage ACL blade

Figure 8.10 shows two tabs. The Access Permissions tab is in focus. The Azure AD security group BRAINJAMMER has been granted Access‐Read and Access‐Execute permissions, which means the content within the ADLS container directory can be listed. Listing the contents of a directory requires both Read (R) and Execute (X) permissions. The individual who was added to the Storage Blob Data Reader RBAC group shown in Figure 8.17 has been granted Access‐Write and Access‐Execute. Write (W) and Execute (X) ACL permissions are required to create items in the targeted directory. The other tab, Default Permissions, is where you can configure permissions that will be applied to the child items created below the root directory, which is the one in focus, as shown under the Set and Manage Permissions For heading. Now that you have some insights into data security concepts, features, and products, continue to the next section, where you will implement some of what you just learned.

Implement Data Security

Until your security objectives and requirements are finalized, you should not proceed with any form of implementation. You need to first know specifically what your goal is before you begin taking action. If your business model requires that your data complies with industry regulations, the requirements to meet those rules must be part of your design. Remember that Microsoft Purview and Azure Policy are helpful tools for guiding you through regulatory compliance. Those tools are also helpful for discovering your data sources and determining which sensitivity levels they require. Those sensitivity levels provide guidance into the level of security to apply to the dataset. After completing those steps, use something like the layered security diagram shown in Figure 8.1 as a guide for implementing security. The following sections cover the information protection, access management, and network security layers. The threat protection layer, which includes features like anomaly activity detection and malware detection, is best designed and implemented by security professionals. Note, however, that Microsoft Defender for Cloud is specifically designed for securing, detecting, alerting, and responding to bad actors and malicious activities preventing them from doing harm.

Azure Policy – Keeping Data Safe and Secure

One of the first experiences with a policy in this book came in Exercise 4.5, where you implemented data archiving. You used a lifecycle management policy and applied it directly to an Azure storage account. The policy, which you can view in the Chapter04/Ch04Ex04 directory on GitHub, identifies when blobs should be moved to Cold or Archived tier and when the data should be purged. Azure Policy, on the other hand, enables an Azure administrator to define and assign policies at the Subscription and/or Management Group level. Figure 8.9 illustrates how the Azure Policy Overview blade may look.

FIGURE 8.9 The Azure Policy Overview blade

Each policy shown in Figure 8.9 links to the policy definition constructed using a JSON document, as follows. You can also assign the policy to the Subscription and a Resource group.

The policy rule applies to all resources with an ARM resource ID of Microsoft.Storage and applies to the minimumTlsVersion attribute. When this policy is applied to the Subscription, TLS 1.2 will be the default value when provisioned, but the policy will also allow TLS 1.1; however, TLS 1.0 is not allowed. The provisioning of an Azure storage account that uses TLS 1.0 would fail because of this policy.

Design a Data Retention Policy

Data discovery and classification are required for determining the amount of time you need to retain your data. Some regulations require maximum and/or minimum data retention timelines, depending on the kind of data, which means you need to know what your data is before designing the retention policy. The policy needs to include not only your live, production‐ready data but also backups, snapshots, and archived data. You can achieve this discovery and classification using what was covered in the previous few sections of this chapter. You might recall the mention of Exercise 4.5, where you created a lifecycle management policy that included data archiving logic. The concept and approach are the same here. The scenario in Exercise 4.5 covered the movement and deletion of a blob based on the number of days it was last accessed. However, in this scenario the context is the removal of data based on a retention period. Consider the following policy example, which applies to the blobs and snapshots stored in Azure storage account containers. The policy states that the data is to be deleted after 90 days from the date of creation. This represents a retention period of 90 days.

When it comes to defining retention periods in relational databases like Azure SQL and Azure Synapse Analytics SQL pools, there are numerous creative approaches. One approach might be to add a column to each data row that contains a timestamp that identifies its creation date. You then can run a stored procedure executed from a cron scheduler or triggered using a Pipeline activity. As this additional information can be substantial when your datasets are large, you need to apply it only to datasets that are required to adhere to such policies. It is common to perform backups of relation databases, so remember that the backups, snapshots, and restore points need to be managed and bound to retention periods, as required. In the context of Azure Databricks, you are most commonly working with files or delta tables. Files contain metadata that identifies the creation and last modified date, which can be referenced and used for managing their retention. Delta tables can also include a column for the data’s creation date; this column is used for the management of data retention. When working with delta tables, you can use a vacuum to remove backed up data files. Any data retention policy you require in that workspace should include the execution of the vacuum command.

A final subject that should be covered in the context of data retention is something called time‐based retention policies for immutable blob data. “Immutable” means that once a blob is created, it can be read but not modified or deleted. This is often referred to as a write once, read many (WORM) tactic. The use case for such a feature is to store critical data and protect it against removal or modification. Numerous regulatory and compliance laws require documents to be stored for a given amount of time in their original state.

Exam Essentials – Design and Implement a Data Stream Processing Solution

Azure Event Hubs, Azure Stream Analytics, and Power BI. When you are designing your stream processing solution, one consideration is interoperability. Azure Event Hubs, Azure Stream Analytics, and Power BI are compatible with each other and can be used seamlessly to implement your data stream processing design. Other products are available on the Azure platform for streaming, such as HDInsight 3.6, Hadoop, Azure Databricks, Apache Storm, and WebJobs.

Windowed aggregates. Windowing is provided through temporal features like tumbling, hopping, sliding, session, and snapshot windows. Aggregate functions are methods that can calculate averages, maximums, minimums, and medians. Windowed aggregates enable you to aggregate temporal windows.

Partitions. Partitioning is the grouping of similar data together in close physical proximity in order to gain more efficient storage and query execution speed. Both efficiency and speed of execution are attained when data with matching partition keys is stored and retrieved from a single node. Data queries that pull data from remote datastores, different partition keys, or data that is located on more than a single node take longer to complete.

Time management. The tracking of the time when data is streaming into an ingestion point is crucial when it comes to recovering from a disruption. The timestamps linked to an event message, such as event time, arrival time, and the watermark, all help in this recovery. The event time identifies when the data message was created on the data‐producing IoT device. The arrival time is the enqueued time and reflects when the event message arrived at the ingestion endpoint, like Event Hubs.

Watermark. As shown in Figure 7.41, the watermark is a time that reflects the temporal time frame in which the data was processed by the stream processor. If the time window is 5 seconds, all event messages processed within that time window will receive the same watermark.

Create an Azure Key Vault Resource – Keeping Data Safe and Secure-2

The Networking tab enables you to configure a private endpoint or the binding to a virtual network (VNet). The provisioning and binding of Azure resources to a VNet and private endpoints are discussed and performed in a later section. After the provisioning the key vault, you created a key, secret, and a certificate. The keys in an Azure key vault refer to those used in asymmetric/public key cryptography. As shown in Figure 8.2, two types of keys are available with Standard tier: Rivest‐Shamir‐Adleman (RSA) and elliptic curve (EC). These keys are used to encrypt and decrypt data (i.e., public‐key cryptography). Both keys are asymmetric, which means they both have a private and public key. The private key must be protected, as any client can use the public key to encrypt, but only the private key can decrypt it. Each of these keys has multiple options for the strength of encryption. For example, RSA has 2,048, 3,072, and 4,096 bits. The higher the number, the higher the level of security. High RSA numbers have caveats concerning speed and compatibility. The higher level of encryption requires more time to decrypt, and not all platforms can comply with such high levels of encryption. Therefore, you need to consider which level of security is best for your use case and security compliance requirements.

A secret is something like a password, connection string, or any text up to 25k bytes that needs protection. Connection strings and passwords commonly are stored in configuration files or hard coded into application code. This is not secure, because anyone who has access to the code or the server hosting the configuration file has access to the credentials and therefore the resources protected by them. Instead of that approach, applications can be coded to retrieve the secret from a key vault, then use it for making the required connections. In a production environment, the secret can be authenticated against a managed identity or service principal when requested.

Secrets stored in a key vault are encrypted when added and decrypted when retrieved. The certificate support in Azure Key Vault provides the management of x509 certificates. If you have ever worked on an Internet application that uses the HTTP protocol, you have likely used an x509 certificate. When this type of certificate is applied to that protocol, it secures communication between the entities engaged in the conversation. To employ the certificate, you must use HTTPS, and this is commonly referred to as Transport Layer Security (TLS). In addition to securing communication over the Internet, certificates can also be used for authentication and for signing software. Consider the certificate you created in Exercise 8.1. When you click the certificate, you will notice it has a Certificate Version that resembles a GUID but without the dashes. Associated to that Certificate Version is a Certificate Identifier, which is a URL that gives you access to the certificate details. When you enter the following command using the Azure CLI, you will see information like the base‐64–encoded certificate, the link to the private key, and the link to the public key, similar to that shown in Figure 8.6.

FIGURE 8.6 Azure Key Vault x509 certificate details

The link to the private key and public keys can be used to retrieve the details in a similar fashion. The first Azure CLI cmdlet retrieves the private key of the x509 certificate, which is identified by the kid attribute. The second retrieves the public key using the endpoint identified by the sid attribute.

The ability to list, get, and use keys, secrets, and certificates is controlled by the permissions you set up while creating the key vault. Put some thought into who and what gets which kind of permissions to these resources.