Implement Data Masking – Keeping Data Safe and Secure

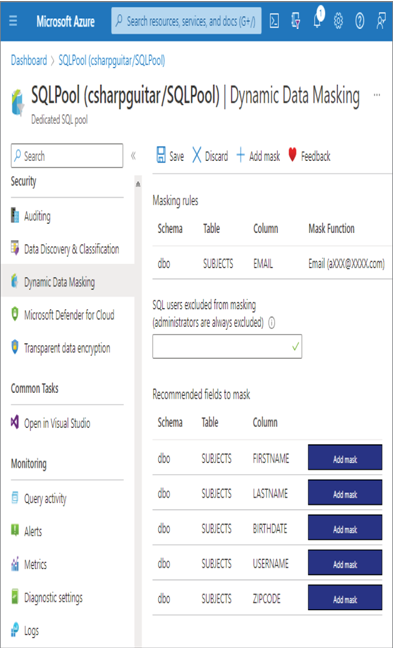
- Log in to the Azure portal at https://portal.azure.com ➢ navigate to the Azure Synapse Analytics workspace you created in Exercise 3.3 ➢ select the SQL Pools navigation menu link ➢ select your dedicated SQL pool ➢ start the SQL pool ➢ after the SQL pool is running, select the Dynamic Data Masking blade ➢ select the + Add Mask menu item ➢ make the configurations as shown in Figure 8.39 ➢ and then click the Add button.
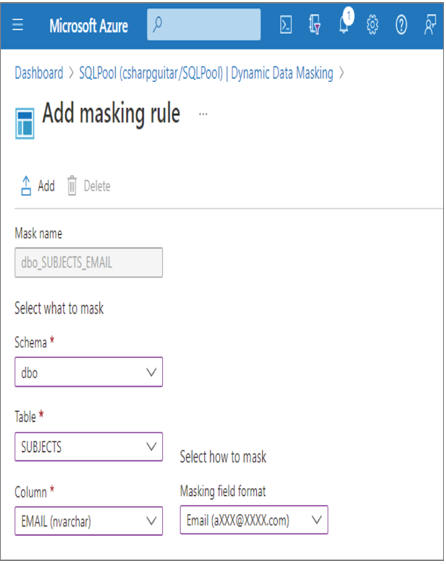
FIGURE 8.39 Implement data masking and masking rule.
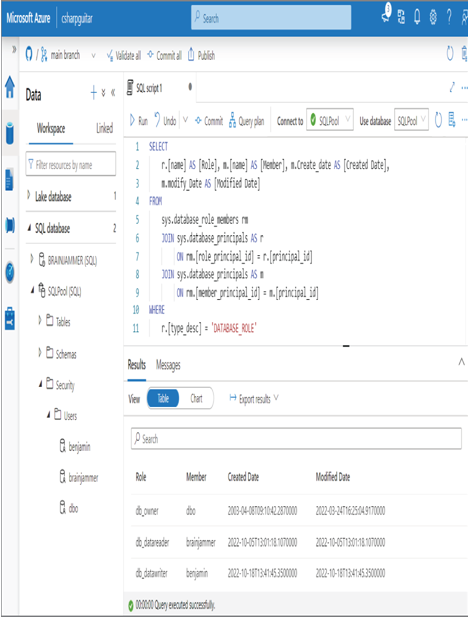
- Click the Save button ➢ log in to the dedicated SQL pool using Azure Data Studio, with the credentials created in Exercise 8.7 ➢ and then execute the following:
SELECT ID, FIRSTNAME, LASTNAME, EMAIL, COUNTRY, CREATE_DATE FROM dbo.SUBJECTS - Notice that the data in the EMAIL column has the mask configured in step 1 and illustrated in Figure 8.39. Stop the dedicated SQL pool.
It is possible to configure a custom mask instead of using the preconfigured masks. This requires that you provide the number of starting characters to show, followed by the padding string (something like xxxxx.), followed by the number of ending characters to display. Using a prefix and suffix value of three and the padding on the EMAIL column would result in benxxxxx.net, for example, which is a bit more useful than what is provided using the default.
Manage Identities, Keys, and Secrets Across Different Data Platform Technologies
Protecting credentials has historically been very challenging. Developers and data engineers need to access data, and that data is protected by an ID and password. As the complexity and size of your organization grows, it is easy to lose control over who has what credentials. Add that loss of control to the potential impact changing a password can have on a production environment. This scenario is commonly referred to as credential leakage. An initial solution to credential leakage was to store connection details in a managed credential store, something like Azure Key Vault. However, access to the credential store also requires credentials, so you are back in the same place as before the implementation of the credential store. The ultimate solution is to use a combination of Azure Key Vault and managed identities. Instead of using a credential to make a connection to a storage account or a database from application code, you instead reference the Azure Key Vault endpoint. An Azure Key Vault secret endpoint resembles the following:
https://<accountName>.vault.azure.net/secrets/<secretName>/5db1a9b5…
The code that uses that endpoint must implement the DefaultAzureCredential class from the Azure Identity library. The library works with all popular programming languages: .NET, Python, Go, Java, etc. Passing a new DefaultAzureCredential class to the SecretClient class results in the acquisition of the managed identity credential, which is a token. The client then stores all necessary attributes to perform the retrieval of a secret from the Azure Key Vault endpoint. The following C# code performs this activity:
var kvUri = “https://” + accountName + “.vault.azure.net”;
var client = new SecretClient(new Uri(kvUri), new DefaultAzureCredential());
You can use the client to get a secret by using the following C# syntax:
var secret = await client.GetSecretAsync(secretName);
Now you know how a managed identity can avoid credential leakage, but you might be wondering what exactly are managed identities and what important aspects must you know in order to implement them safely and securely? Table 8.3 compares the two types of managed identities: system‐assigned and user‐assigned.
TABLE 8.3 Managed identity types
| Characteristic | System‐assigned managed identity | User‐assigned managed identity |
| Provisioning | Azure resources receive an identity by default, where supported. | Created manually |
| Removal | The identity is deleted when the associated Azure resource is deleted. | Deleted manually |
| Sharing | The identity cannot be shared among Azure resources. | Can be shared |
A system‐assigned managed identity is created during the provisioning of the Azure resource. For example, an Azure Synapse Analytics workspace and a Microsoft Purview account both have a system‐assigned identity by default. Azure products that are generally used to make connections to other Azure products or features have this managed identity created by default. In contrast, an Azure storage account receives data but does not commonly push data out to other systems, that would need an identity to do so. This is why you see no managed identities for Azure storage accounts. A system‐assigned managed identity can be used only by the Azure resource to which it is bound, and it is deleted when the Azure resource is deleted. A user‐assigned managed identity can be shared across Azure products and is a separate resource in itself and can have its own lifecycle. Perform Exercise 8.9, where you create a user‐assigned managed identity.
Azure Role‐Based Access Control Design for Data Privacy Handle Interruptions Implement Data Masking Microsoft Certifications Microsoft DP-203