Apply Sensitivity Labels and Data Classifications Using Microsoft Purview and Data Discovery – Keeping Data Safe and Secure

- Log in to the Azure portal at https://portal.azure.com ➢ navigate to the Microsoft Purview Governance Portal you provisioned in Exercise 8.2 ➢ select the Data Estate Insights hub ➢ select the link under the Assets heading on the Data Stewardship blade (the link is represented by the number 49 in Figure 8.26) ➢ scroll down and select the SUBJECTS table link ➢ select the Schema tab ➢ and then click the Edit button. The configuration should resemble Figure 8.27.
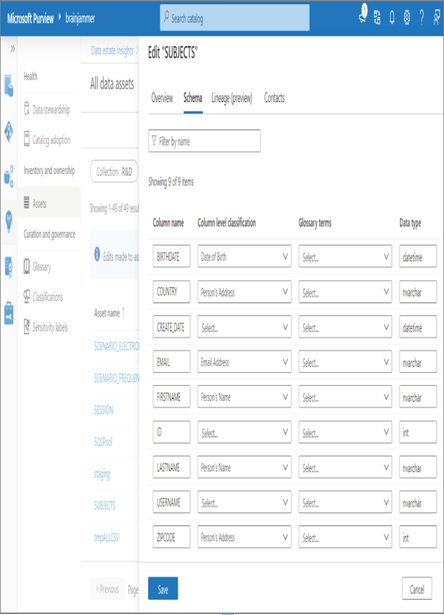
FIGURE 8.27 Microsoft Purview Data estate insights schema data classification
- Click the Save button ➢ observe the results ➢ navigate to the Azure Synapse Analytics workspace you created in Exercise 3.3 ➢ select the SQL Pools navigation menu link ➢ select your dedicated SQL pool ➢ start the SQL pool ➢ and then select Data Discovery & Classification. The following message will appear at the top of the Data Discovery & Classification blade: “Currently using SQL Information Protection policy. We have found 6 columns with classification recommendations,” as shown in Figure 8.28. Click that message. The six columns and the recommendations should resemble Figure 8.28.
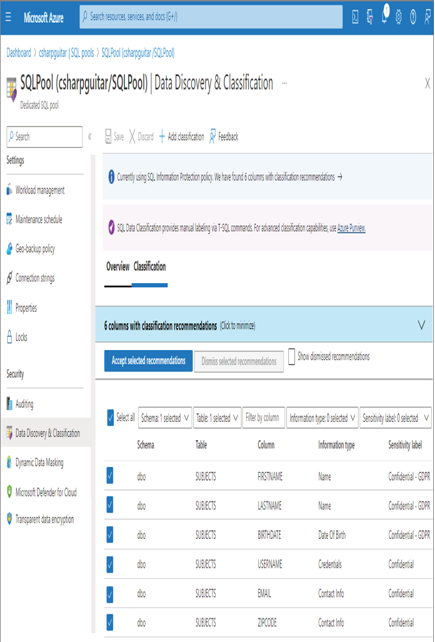
FIGURE 8.28 SQL Information Protection policy classification recommendations
- Click the + Add Classification menu button ➢ select dbo from the Schema Name drop‐down ➢ select SUBJECTS from the Table Name drop‐down ➢ select COUNTRY from the Column Name drop‐down ➢ select Contact Info from the Information Type drop‐down ➢ select General from the Sensitivity Label drop‐down➢ and then click Add Classification. The configuration should resemble Figure 8.29.
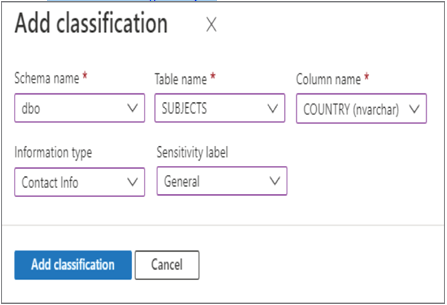
FIGURE 8.29 Data Discovery & Classification, Add classification 2
- Select the Select All check box ➢ click the Accept Selected Recommendations button ➢ and then click Save. The Overview tab will display something similar to Figure 8.30.
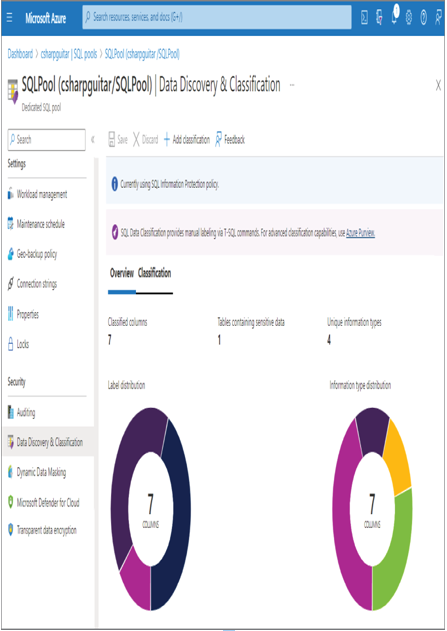
FIGURE 8.30 Data Discovery & Classification overview
- Execute the following two SQL statements on your dedicated SQL pool. The statements are in the auditSubjects.sql file in the Chapter08/Ch08Ex05 directory on GitHub.
- Navigate back to your Dedicated SQL Pool blade in the Azure portal ➢ select the Auditing navigation menu item ➢ select View Audit Logs ➢ select Log Analytics ➢ and then execute the following query; the query is in the Chapter08/Ch08Ex05 directory on GitHub.
- Notice the contents added to the DataSensitivityInformation column. Consider stopping the dedicated SQL pool.
Microsoft Purview is an extensive tool, and many of its capabilities are outside the scope of this book. A note in Figure 8.30 nicely summarizes Microsoft Purview: “For advanced classification capabilities, use Azure Purview.” This is because Microsoft Purview can span a much greater scope of data sources when compared to the Auditing capabilities available for the dedicated SQL pool and an Azure Synapse Analytics workspace. The exercises that included Microsoft Purview are meant as an introduction to get you started. In step 1 of Exercise 8.5, you added column level classification values to the SUBJECTS table. In step 3, you added information type values (aka column‐level classification values) and sensitivity labels to the SUBJECTS table again. You also added an additional classification on the COUNTRY column of the SUBJECTS table with a sensitivity label of General.
After these data labeling activities were completed, and because Auditing is enabled on this dedicated SQL pool, the INSERT and SELECT statements were logged. Navigating to your Log Analytics workspace and executing the query that searches the SQLSecurityAuditEvents table, you notice some new results being populated into the DataSensitivityInformation column. The following is a summary of the result. The full value from that column is in the DataSensitivityInformation.xml file in the Chapter08/Ch08Ex05 directory on GitHub.
The information contained in the DataSensitivityInformation column describes the security label and type of information being retrieved by the SELECT statement. Remember that the SELECT statement is stored in the Statement column. Using the data in this table in combination with the user identity stored in the ServerPrincipalName column provides good information about who accessed what information and how often. There are many methods for adding sensitivity labels. Consider, for example, the following SQL statement, which sets the CREATE_DATE column on the SUBJECTS table to Public:
ADD SENSITIVITY CLASSIFICATION TO dbo.SUBJECTS.CREATE_DATE
WITH ( LABEL=’Public’, INFORMATION_TYPE=’Administrative’, RANK=LOW )
The Azure CLI also provides many options for managing data classifications. To view the sensitivity label that was placed on the CREATE_DATE column by the SQL statement, execute the following Azure CLI cmdlet, which is followed by the output:
az synapse sql pool classification show –name sqlpool \
You can also create sensitivity labels using Azure CLI cmdlets. The last topic to cover concerning managing sensitive information has to do with the management of files. Up to this point the context has been on tables within a relational database. However, while working on a data analytics solution, you will very likely come across the scenario of sensitive data sent and received within files.
To protect sensitive data, you can create directory structures like the following, which include a directory named Confidential, for example:
EMEA\brainjammer\raw-files\Confidential\YYYY\MM\DD\HH
EMEA\brainjammer\cleansed-data\Confidential\YYYY\MM\DD
EMEA\brainjammer\business-data\Confidential\YYYY\MM
Then, as shown in Figure 8.31, the directories are protected using ACLs.

FIGURE 8.31 Protecting sensitive data in files
Figure 8.31 is taken from Microsoft Azure Storage Explorer and illustrates that one individual and the Azure Synapse Analytics service principal identity have ACL access to the Confidential directory. Consider creating a folder for each sensitivity label—for example, Public, General, Highly Confidential, and GDPR—and granting the necessary permissions to groups and service principals based on your business requirements.
Implement a Data Retention Policy
In Exercise 4.5, you implemented an Azure Storage account lifecycle management policy. By adding the deleteAfter90Days policy definition, as discussed previously, you would realize the implementation of a data retention policy in this context. To implement a data retention policy that applies to data stored on a relational database, for example, an Azure Synapse Analytics dedicated SQL pool, complete Exercise 8.6.