Configure and Perform a Data Asset Scan Using Microsoft Purview – Keeping Data Safe and Secure-1

- Log in to the Azure portal at https://portal.azure.com ➢ navigate to the Azure Synapse Analytics workspace you created in Exercise 3.3 ➢ select the Access Control (IAM) navigation menu item ➢ click the + Add menu button ➢ select Add Role Assignment from the drop‐down list ➢ select Reader from the Role list ➢ click Next ➢ select the Managed Identity radio button ➢ click the + Select member link ➢ select Microsoft Purview Account from the Managed Identity drop‐down list box ➢ select the Microsoft Purview account you created in Exercise 8.2 ➢ click the Select button ➢ click the Review + Assign button ➢ navigate to the Overview blade ➢ click the Open link in the Open Synapse Studio tile ➢ select the Manage hub ➢ select SQL Pools from the menu list ➢ and then start the dedicated SQL pool.
- Select the Manage hub ➢ select the Microsoft Purview item in the External Connections section ➢ click the Connect to a Purview Account button ➢ select the Purview account created in Exercise 8.2 (for example, brainjammer) ➢ click Apply ➢ and then select the link to your Microsoft Purview account tab, as shown in Figure 8.20.

FIGURE 8.20 Connecting Microsoft Purview to Azure Synapse Analytics workspace
- Select the Data Map hub ➢ select Sources from the navigation menu ➢ select the Register menu item ➢ select Azure Synapse Analytics from the Register Source window ➢ click Continue ➢ enter a name (I used ASA‐csharpguitar) ➢ select the workspace you configured in step 2 from the Workspace Name drop‐down list box ➢ select the R&D collection from the Select a Collection drop‐down list box ➢ and then click Register.
- Select the View Details link on the just registered source in the Map view ➢ select the New Scan menu item ➢ enter a name (I used ScanDedicatedSQLPool) ➢ select + New from the Credential drop‐down list box ➢ enter a name (I used sqladminuser) ➢ enter the user ID/name of your Azure Synapse Analytics dedicated SQL pool (I used sqladminuser) ➢ select the + New from the Key Vault Connection drop‐down list box ➢ enter a name (I used brainjammerKV) ➢ select the Key Vault you created in Exercise 8.1 ➢ click Create ➢ enter the Azure Key Vault secret name that stores your Azure Synapse Analytics password (I used azureSynapseSQLPool) ➢ click Create ➢ select your dedicated SQL pool from the SQL Database drop‐down list box ➢ select the Test Connection link ➢ and then click Continue. The configuration resembles Figure 8.21.

FIGURE 8.21 Configuring scanning in Microsoft Purview
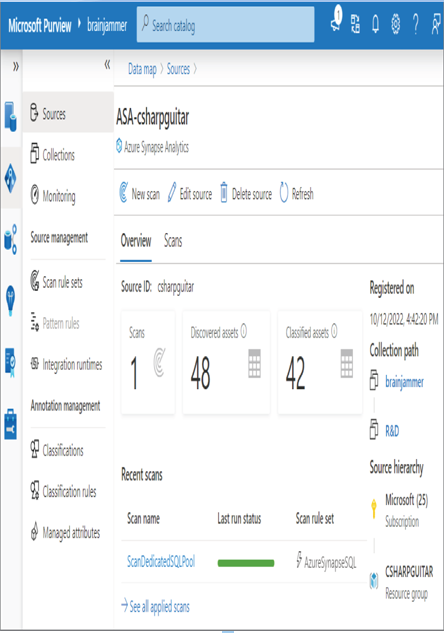
- Click the Continue button to perform the scan using the default scan rule set ➢ select the Once radio button ➢ click Continue ➢ and then click the Save and Run button. When the scan is complete, you will see something like Figure 8.22.

FIGURE 8.22 The result of a Microsoft Purview scan
- Stop your Azure Synapse Analytics dedicated SQL pool.
